Drag and drop an exclusive gateway in your process after the user task.
We are using exclusive gateway as it allows to split your path in more than one path.
YOu need to specify one default path and you can also assign the order in which you want the process to follow the path.

now right click on the line joining the gateway and the fileWrite service
Go to properties
Select type as condition and then select and xpath expression
In my case i have selected the condition as order number should be greater than 500

Say ok and you will find an error in the gateway, This is because there is not default path for exclusive gateway and as per definition of it there must be a default path

Copy and past the End activity in the lower pane to the upper pane.
It will show an error message as currently it is not linked.
Right click on your exclusive gateway and say Add default sequence flow.
add the flow to the new end activity that you have added in the upper pane.

Once you will add that all the errors will be gone.
You can also notice that the default path has a cut which identifies it as a default path.
One can add as many condition path as required in exclusive gateway and decide on the order of the processing.

You can double click on the gateway to decide the order if there are multiple paths

Initialize the record once with order number less than 500 and once with greater than 500

For order number less than 500 the flow completed without calling the fileWrite
for order number greater than 500 the flow completes with FileWrite


So now we are able to route the process based on some condition this can be done in a much better way by integrating with business rules that we will later in incoming posts.
for now we will try to modify the existing code and see how we can ensure that after initiating the request the request goes to the next approver.
Now go to your BPMN process and drag and drop a User task in the lower pane name it as approver, Create a human task for that and create data association for the same.

AFter completing the wizard the process should look like this

Go ahead and redeploy your process to the server.
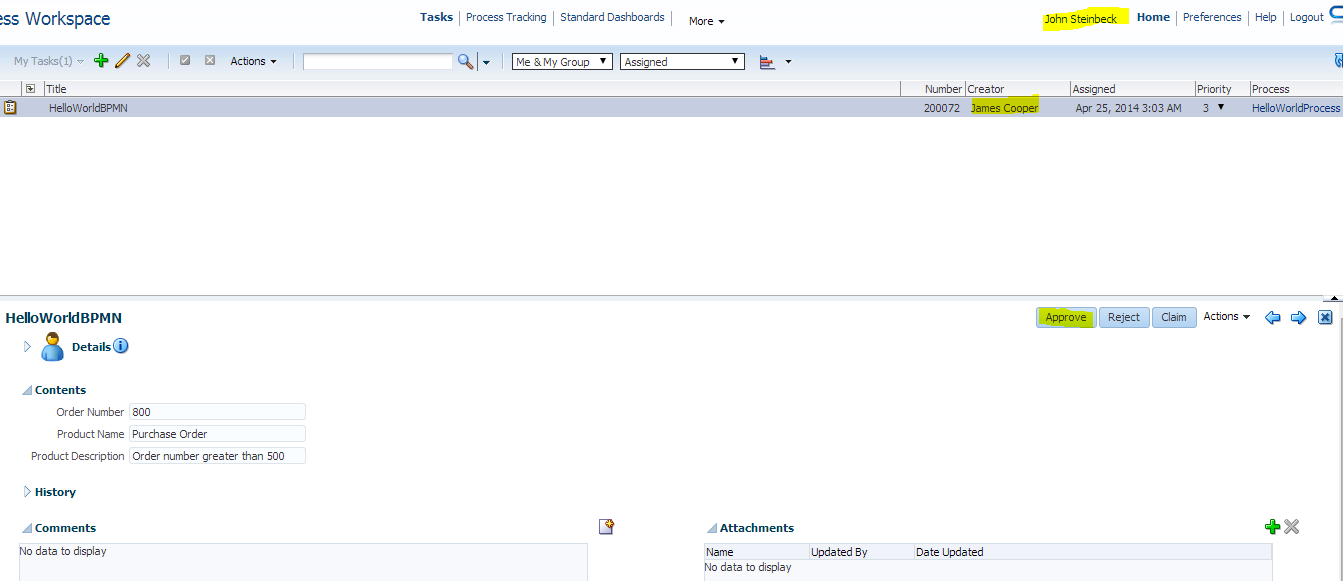
Now log in to BPM workspace as jcooper user and test your process

Submit an order

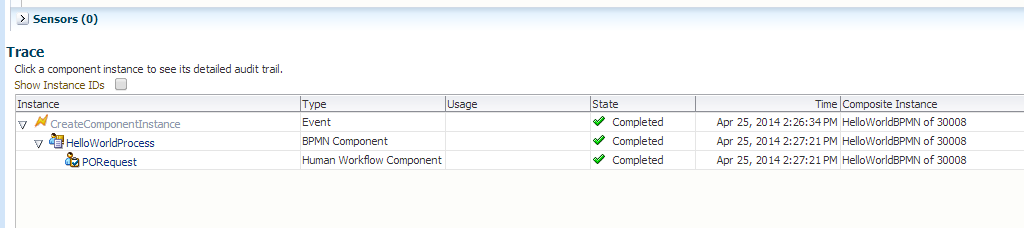
Once you submit an order go to em console to check it status
you will find it is stuck in next level for approval

Log in again to bpm workspace this time with jstein user

Go to process tracking select the task and approve it

Once the task is approved go back to your em console and validate the instance and you can find that the process is completed now

there is one problem only with this that we are not able to see the payload which is passed by initiator in the reviewers page.
This is because we have not yet created a page for the approver human task.
Go to the .task file of approver and auto generate the jsp task form

Now initiate one more process and login to bpm workspace with jstein user and you can now see the payload passed by jcooper
No comments:
Post a Comment