Thursday, March 18, 2010
Web Service Interoperability Compliance
Web service Interoperability compliance organization is an organization which takes care of interoperability of the WSDL documents.Interoperability here means how the web services is interacting in different environment and different platform,programming language,operating system.
We will be downloading the Basic profile testing tool from the web service interoperability location
http://www.ws-i.org/deliverables/workinggroup.aspx?wg=testingtools
We will de downloading here Interoperability Testing Tools 1.1.
Download it for java
Java: zip (3.66M)
and unzip it
We will use Jdeveloper IDE to test the interoperability of the web services.
Now open your jdeveloper
In JDeveloper select Tools > Preferences from the menu.
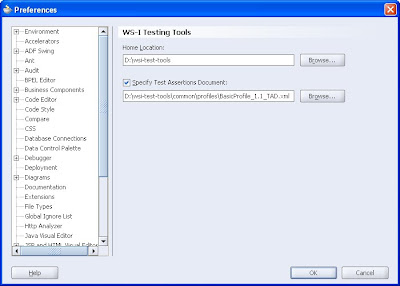
In the Preferences dialog, select WS-I Testing Tools.
Now Browse and navigate to the location where you unzipped the downloaded file and Select the BasicProfile_1.1_TAD.xml file and click Open.
So it should look like this
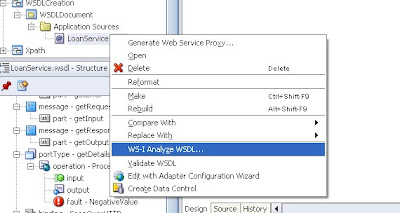
NOw select the WSDL document you have created and right click on it to select WS-I analyse wsdl.We will be using the WSDL that we have created in one of our earlier post"Creating WSDL document using Jdeveloper IDE"
Once you will click on it a new gui will open up like this
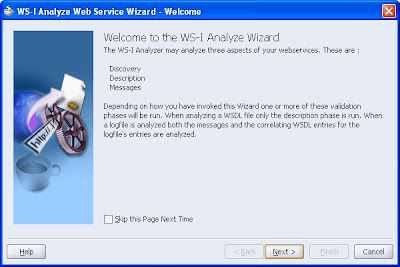
Say next
choose the wsdl elements you want to analyse

now say next and say finish

Now once you will say finish a report will be generated.
NOw In the editor for wsi-report.html, scroll down to the Summary section there you should see that the wsdl has passed.
We will be downloading the Basic profile testing tool from the web service interoperability location
http://www.ws-i.org/deliverables/workinggroup.aspx?wg=testingtools
We will de downloading here Interoperability Testing Tools 1.1.
Download it for java
Java: zip (3.66M)
and unzip it
We will use Jdeveloper IDE to test the interoperability of the web services.
Now open your jdeveloper
In JDeveloper select Tools > Preferences from the menu.
In the Preferences dialog, select WS-I Testing Tools.
Now Browse and navigate to the location where you unzipped the downloaded file and Select the BasicProfile_1.1_TAD.xml file and click Open.
So it should look like this

NOw select the WSDL document you have created and right click on it to select WS-I analyse wsdl.We will be using the WSDL that we have created in one of our earlier post"Creating WSDL document using Jdeveloper IDE"

Once you will click on it a new gui will open up like this

Say next
choose the wsdl elements you want to analyse

now say next and say finish

Now once you will say finish a report will be generated.
NOw In the editor for wsi-report.html, scroll down to the Summary section there you should see that the wsdl has passed.
Wednesday, March 17, 2010
OSB-Oracle ServiceBus
Before going in to any theory section we will first install OSB and check its functionality one by one.
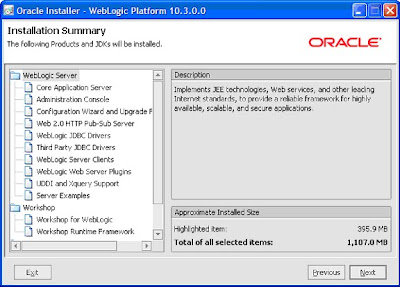
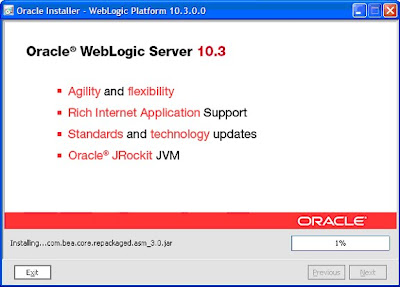
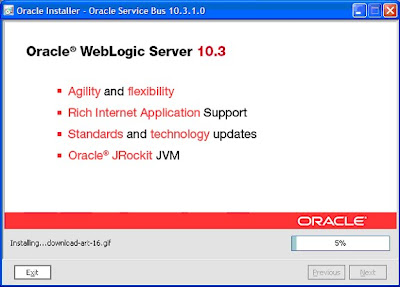
The latest version of OSB is 10.3.1 which is installed on top of weblogic server 10.3
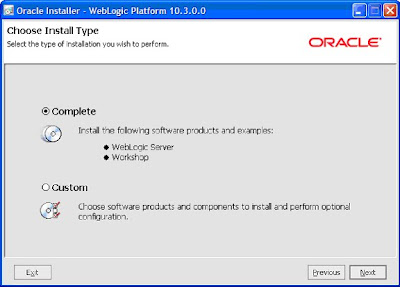
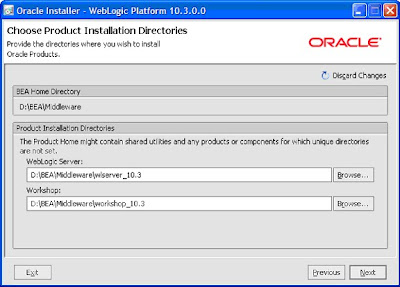
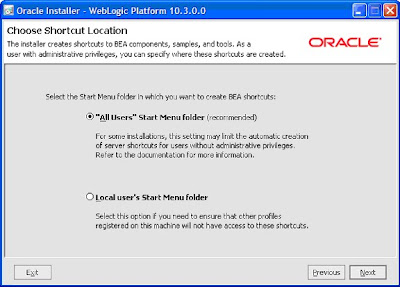
So the very first step is installing weblogic server 10.3
The screen shots below will guide you through that.
step1
========
step2
=======

step3
=======
Step4
======
step5
=======
step6
========
step7
========
step8
========
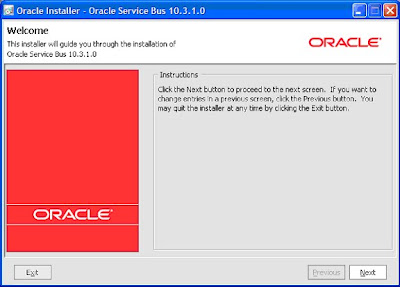
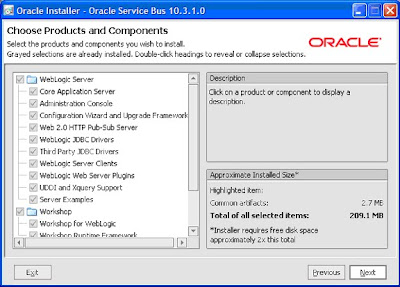
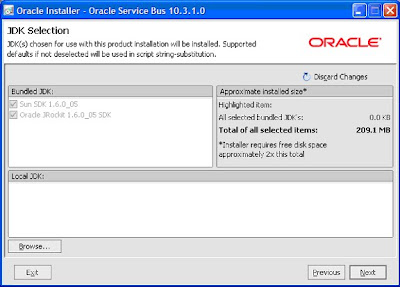
Now the next step is to install OSB on top of weblogic server.
Step1
=======

step2
=========
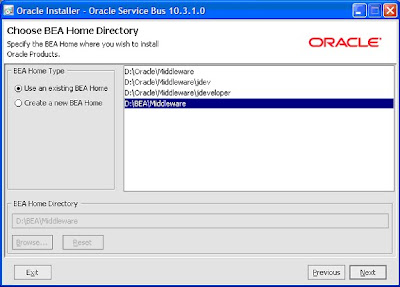
step3
======
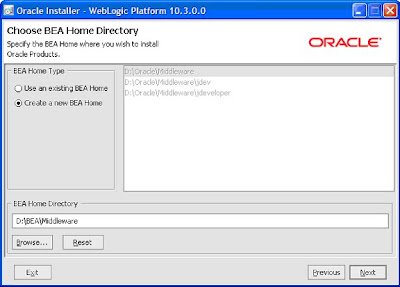
choose the BEA HOME that you have created in the earlier step.
step4
=======
step5
=========
step6
=======
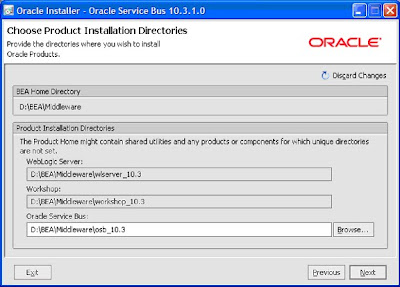
Step7
======
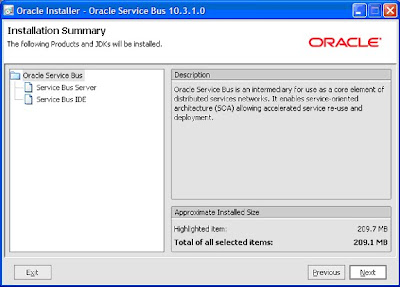
step8
=======
Step9
======
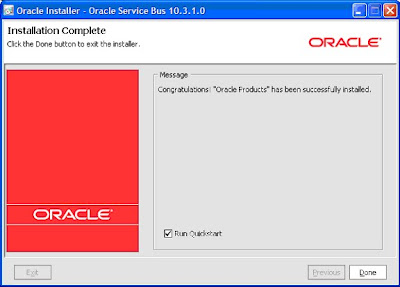
So you are done with the installation of OSB
The latest version of OSB is 10.3.1 which is installed on top of weblogic server 10.3
So the very first step is installing weblogic server 10.3
The screen shots below will guide you through that.
step1
========

step2
=======

step3
=======

Step4
======

step5
=======

step6
========

step7
========

step8
========

Now the next step is to install OSB on top of weblogic server.
Step1
=======

step2
=========

step3
======
choose the BEA HOME that you have created in the earlier step.

step4
=======

step5
=========

step6
=======

Step7
======

step8
=======

Step9
======

So you are done with the installation of OSB
Monday, March 15, 2010
Configuring Weblogic with Tibco EMS Server queue
We will check how can we configure Weblogic with Tibco EMS Server.
The first thing required for this use is to install tibco EMS server.
Steps1
==========

step2
=======

step3
=======

step4
=======

step5
=======

step6
=========

step7
=========

step8
=========

Now once the server is installed you need to start the server and log in to the admin console.
GO to the installation directory
TIBCO_HOME\ems\bin and pass a command

It will start the server

Now again log in to the admin console.Open a new command prompt and go to TIBCO_HOME\ems\bin directory and pass a command tibemsadmin.exe

Now try to connect to the server
connect tcp://arahi-pc2:7222

Provide user as admin and password will remain blank just say enter and you will be connected to the admin tool.

Now just do
"help create" and you will get all the details for creating a queue

Now we will create a queue and other related stuff.
Now create a connection factory ,a queue and add url property to the connection factory.
Use following commands
create factory XAQueueConnectionFactory xaqueue
create queue DemoQueue
addprop factory XAQueueConnectionFactory url=tcp://arahi-pc2:7222

In order to see these changes
GO to TIBCO_HOME\ems\bin\factory.conf you will get entries
[XAQueueConnectionFactory]
type = xaqueue
url = tcp://arahi-pc2:7222
I couldn't complete the integration because i have to switch to some other integration task.
But to add you have to use tibjms.jar and tibrvjms.jar to make this thing work.Even i am not sure what all steps to be followed.
Seeking reader's input if some one has completed but a fair idea is
you need to create a jms queue in welbogic and need to provide same name for queue and connection factory as mentioned in the EMS-server.Need lots of R&D ,hit and trail and then you might come up with successfull integration.Best wishes.
Sunday, March 14, 2010
Fault Management Framework in SOA Suite
A fault management framework in SOA suite works much like handling exceptions in java.
It is done by defining fault policies.A fault policy thus defines a fault condition and also provides the action that has to be performed in case of fault condition.
Fault policies are provided by default with the istallation and can be found in the following location
SOA_HOME\bpel\domains\domain_name\config\fault-policies\
Default-policy.xml
Fault policy can be defined at following levels Partner link,Port type,Process and Domain level.It is the work of a fault binding file to associate the fault policy with the partnerlink,port type,process and Domain.
For the domain level the fault binding policy is located at
SOA_HOME\bpel\domains\domain_name\config\fault-bindings.xml
For process level the fault binding policy is defined at bpel.xml
The order of fault-binding is
1>Partner link binding in bpel.xml
2>Port type binding in bpel.xml
3>Process binding in bpel.xml
4>Partner link binding in fault-binding.xml
SOA_HOME\bpel\domains\domain_name\config\fault-bindings.xml
5>Port type binding in fault-binding.xml
6>Process binding in fault-binding.xml
The fault-binding policy has a precedence over catch blocks designed in process so the engine first looks for the fault binding policy and if it doesn't get a match then it enters the catch block.
Configuration file for designing fault-binding.
In order to design fault-binding you will be using 3 configuration files essentially.
The first one is fault-policy.xml
this is the file where in we define the fault condition and the action that has to be performed for the error condition.
so it should contain values
<faultName xmlns:bpelx="http://schemas.oracle.com/bpel/extension" name="bpelx:remoteFault">
<condition>
<action ref="ora-retry"/>
</condition>
</faultName>
here we are defining the condition that whenever a remoteFault occurs you have to refer to the ora-retry
So again we need to define the action
that will again be done in this way
<Action id="ora-retry">
<retry>
<retryCount>8</retryCount>
<retryInterval>2</retryInterval>
<retryFailureAction ref="ora-terminate"/>
<exponentialBackoff/>
</retry>
</Action>
this action template suggest that whenever there is a remote fault the you have to perform the ora-retry action which sugggest to retry the feature again.It will retry for 8 times with a time interval of 2 seconds and then again it will refere to ora-terminate which will end the process.
the template ora-retry,ora-terminate are predefined template.You can provide fault-policy name any name as per your requirement but it must follow the xsd file
fault-policy.xsd schema
available in the SOA_HOME\bpel\system\xmllib
So you need to change the fault-policy.xsd for changing the fault-policy name.
SOA suite provides a default fault policy.xml file located at
SOA_HOME\bpel\domains\default\config\fault-policies
it is called as DefaultPolicy.xml
now we have designed our default policy the next things is to design the binding that it to associate the falut-policy with the partnerlink,process or port type as per business requirement.
This can be done by one more file called as fault-binding.xml
it is located at
SOA_HOME\bpel\domains\default\config
A quick review of this file will show how to design your fault-binding.
<?xml version="1.0" encoding="UTF-8"?>
<faultPolicyBindings version="2.0.1"
xmlns="http://schemas.oracle.com/bpel/faultpolicy"
xmlns:xsi="http://www.w3.org/2001/XMLSchema-instance">
<!-- Enabling this will cause all processes in this domain to use this
fault policy
<process faultPolicy="DefaultPolicy"/>
-->
<!-- DefaultPolicy is defined in ./fault-policies/DefaultPolicy.xml -->
<partnerLink faultPolicy="DefaultPolicy">
<!-- Enabling this will cause all invoke faults at partner link
name of "creditRatingService" to use fault policy with
id id = DefaultPolicy
<name>creditRatingService</name>
-->
<!-- all invoke faults at partner link below port type use fault policy
with id = DefaultPolicy
<portType xmlns:demo="http://xmlns.oracle.com/pcbpel/adapter/db/insert/">demo:port</portType>-->
</partnerLink>
</faultPolicyBindings>
As you can see here examples have been given if you want to bind it to at domain-level,process level,partnerlink level or port level.
or if you don't want to use the fault-binding.xml you can optionally add the binding in bpel.xml
<faultPolicyBindings>
<process faultPolicy="BillingFaults"/>
<!-----below uses policy BillingFaults--->
<partnerLink xmlns:demo="http://services.otn.com" faultPolicy="DefaultPolicy">
<name>ServiceName</name>
</partnerLink>
</faultPolicyBindings>
Here i have made an entry for partnerlink only you can add as per your requirement.
Save the changes you need to restart your server in order to make these changes take effect.
Restart and check if the fault policy works for you.
fault-policies.xml loads at startup and once you made the change u need to restart ur server
Creating WSDL document using Jdeveloper IDE
WSDL is an XML based langauge for defining web services.
We will be using JDeveloper IDE to create a WSDL document.
OPen Jdeveloper and create a new application.

Create a project

NOw select the project and right click on it to create a new project.Choose business tier ,web services and then WSDL document as shown below.

Give some name to the WSDL document

NOw select the wsdl document and navigate to the structure tab select types and create a new type.Now select the types right click on it and add inside the type an XSD schema as shown below.

choose the XSD option in the new gui

now go to your wsdl service switch to the source tab and replace
with following
xmlns="http://www.w3.org/2001/XMLSchema"
xmlns:SOAP-ENC="http://schemas.xmlsoap.org/soap/encoding/"/>
This is just to add the namespace for the SOAP message and the target message.
so now your wsdl document should look like this

NOw select the schema you have created and insert inside the schema elements.

Provide the element name

provide the type of the element as string

SO overall your message structure in wsdl source should look like this
xmlns:SOAP-ENC="http://schemas.xmlsoap.org/soap/encoding/">
NOw Click on Message in the structure tab now and create a new message

now select the message created and input a part in to it.


Similarly create messages getOutput of type ouput and getFault of type error.
so now your screen should look like this.

NOw we have defined our message type the next task is to define the port.Port defines the signature of a method which includes the operation and the messages that the method use.
Right click on port types and create a port type

now insert an operation in the port type


Now check in the design tab the wsdl document you will get the input output and the negative value mapped against corresponding messages

The next part in creating the service interface is defining the bindings. You bind the Port Type to a specific protocol (HTTP) and data format (SOAP).
In the Structure window, right-click Bindings and insert a new binding.

so now the screen should look something like this

Now check your wsdl document in source tab you will get an entry like this for the negative value
The parts used for the Negative value should be getError that we have defined for the error so just change it to following,Also it should be a part of fault so it should be changed to following
Now the design should show

Now the Final step is to create service definition. This definition includes the port that specifies the binding that a particular implementer is going to implement and possibly the server where the service will run.
Right click on service and create a new service

Now insert a port inside the service


Now the screen should look like

Now select the port and insert inside the port soap address

Provide any arbitrary as for now we are not sure where exactly our application will run.

Now just validate your WSDL

save all your work and you are done with the creation of wsdl