Fault handling is a feature provided in SOA Suite which enables to catch the faults that occurs during run time of a process and performs a user-specified action defined in a fault policy file associated with the activity.
There are two policy files
fault-policies.xml and fault policy bindings file fault-bindings.xml
They have to be placed in the same directory where composite.xml resides.
they can be also placed in different location,For this we need to add two properties in the composite.xml and this option is useful if we have multiple SOA composite applications.
Creating a Fault policy.
For creating a fault policy we create the file fault-policies.xml.
This file contains the conditions and the actions for the process.
Condition here implies under what situation we have to perform action
and action determines what action has to be perfomed for the respective condition.
We will just try to create on fault handling and find how it works.
So a simple fault-binding policy will contain the condition and action as
<Conditions>
<faultName xmlns:test="http://schemas.oracle.com/Test/faults"
name="test:SomeFault">
<condition>
<action ref="testJavaAction"/>
</condition>
</faultName>
Waht it means
It means whenever we have the condition that is the fault test:SomeFault we have to perform testJavaAction.
The action here refers to a reference testJavaAction which we need to define.
So we will define the action as follows
<Actions>
<Action id="testJavaAction">
<!-- this is user provided class-->
<javaAction className="testJavaAction.myClass"
defaultAction="default-terminate">
<returnValue value="MANUAL" ref="default-human-intervention"/>
</javaAction>
</Action>
</Action>
So the action we are performing here is to terminate and return value default-human-intervention
Which is again a refernce to another action
Let suppose we define it
<Action id="default-human-intervention">
<humanIntervention/>
</Action>
The default-human-intervention is a preseeded recovery action tag.So we need not define it.
We also need not return a value.
So in all our fault policie should look like this
<?xml version="1.0" encoding="UTF-8"?>
<faultPolicies xmlns="http://schemas.oracle.com/bpel/faultpolicy"
xmlns:xsi="http://www.w3.org/2001/XMLSchema-instance">
<faultPolicy version="0.0.1" id="FusionMidFaults"
xmlns:env="http://schemas.xmlsoap.org/soap/envelope/"
xmlns:xs="http://www.w3.org/2001/XMLSchema"
xmlns="http://schemas.oracle.com/bpel/faultpolicy"
xmlns:xsi="http://www.w3.org/2001/XMLSchema-instance">
<Conditions>
<faultName xmlns:test="http://schemas.oracle.com/Test/faults"
name="test:SomeFault">
<condition>
<action ref="testJavaAction"/>
</condition>
</faultName>
</Conditions>
<Actions>
<Action id="testJavaAction">
<!-- this is user provided class-->
<javaAction className="testJavaAction.myClass"
defaultAction="default-terminate">
<returnValue value="MANUAL" ref="default-human-intervention"/>
</javaAction>
</Action>
<Action id="default-human-intervention">
<humanIntervention/>
</Action>
</Actions>
</faultPolicy>
</faultPolicies>
you can refer to my following post for a working example on fault handling in SOA Suite 11g.
Wednesday, September 23, 2009
Configuring MQ in 11g SOA Suite
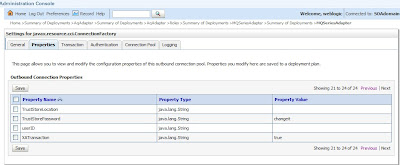
As in earlier version of SOA suite we need to configure oc4j-ra.xml for the mq adapter we will be configuring the same from the console.
go to deployment
Then select mqSeriesAdapter

Now go to configuration -Outbound Connections pools and select the default connection
and say new

Select the connection factory and say next

Now provide the jndi name for the queue.

Say finish .Now select a folder for the deployment plan .Make sure you already have created the folder and say ok

Check the deployment file if it is deployed correctly.

Save the changes.
Go to deployment again choose mqseries adapter and say update.

just say finish and check if it is deployed.

Verify

Now go to the connection and provide the values corresponding to your mq.

If you dont have created a channel.You can use the default channel and port
The default channel i am using is SYSTEM.DEF.SVRCONN and the channel 1414
provide your queue manager name

Also i will enable it for xa transaction
Now we will create the project in jdeveloper and try to connect to a queue.
i will be using the default queue Q1INPUT.
One additional step in configuration is
before using the Oracle MQ Series Adapter add the com.ibm.mq.jar property to the classpath for the Oracle MQ Series Adapter i.e copy the com.ibm.mq.jar file to the/lib folder.
Restart the server and post your query from em console and check the out put in the queue
Now the queue name we willb e providing in jdeveloper while designing the process.

provide the jndi name created


Select to put data in mq

Provide queue name

Choose opaque schema

and say finish

YOu might receive errors like
Exception occured when binding was invoked. Exception occured during invocation of JCA binding: "JCA Binding execute of Reference operation 'Enqueue' failed due to: [MessageProduce] Error while Translation. [MessageProduce] Error while Translation. [MessageProduce] Error while Translation. ". The invoked JCA adapter raised a resource exception. Please examine the above error message carefully to determine a resolution.
or may be error like this
BINDING.JCA-13040
[MessageProduce] Error while Translation.
[MessageProduce] Error while Translation.
[MessageProduce] Error while Translation.
Correct the reported problem if possible. Contact oracle support if error is not fixable.
This is because you are using opaque schema.
So if you define your own schema you can got pass through this error.
It should even work for opaque schema.I am trying to find out will update as soon as i will discover it.
for now you can download the project file from
http://arpitrahi.wordpress.com/2009/09/23/mq-adapter-11g/
location .download and rename it as .zip and unzip.
Make sure you have qmanager and queue same as mine
go to deployment
Then select mqSeriesAdapter

Now go to configuration -Outbound Connections pools and select the default connection
and say new

Select the connection factory and say next

Now provide the jndi name for the queue.

Say finish .Now select a folder for the deployment plan .Make sure you already have created the folder and say ok

Check the deployment file if it is deployed correctly.

Save the changes.
Go to deployment again choose mqseries adapter and say update.

just say finish and check if it is deployed.

Verify

Now go to the connection and provide the values corresponding to your mq.

If you dont have created a channel.You can use the default channel and port
The default channel i am using is SYSTEM.DEF.SVRCONN and the channel 1414
provide your queue manager name

Also i will enable it for xa transaction

Now we will create the project in jdeveloper and try to connect to a queue.
i will be using the default queue Q1INPUT.
One additional step in configuration is
before using the Oracle MQ Series Adapter add the com.ibm.mq.jar property to the classpath for the Oracle MQ Series Adapter i.e copy the com.ibm.mq.jar file to the
Restart the server and post your query from em console and check the out put in the queue
Now the queue name we willb e providing in jdeveloper while designing the process.

provide the jndi name created


Select to put data in mq

Provide queue name

Choose opaque schema

and say finish

YOu might receive errors like
Exception occured when binding was invoked. Exception occured during invocation of JCA binding: "JCA Binding execute of Reference operation 'Enqueue' failed due to: [MessageProduce] Error while Translation. [MessageProduce] Error while Translation. [MessageProduce] Error while Translation. ". The invoked JCA adapter raised a resource exception. Please examine the above error message carefully to determine a resolution.
or may be error like this
BINDING.JCA-13040
[MessageProduce] Error while Translation.
[MessageProduce] Error while Translation.
[MessageProduce] Error while Translation.
Correct the reported problem if possible. Contact oracle support if error is not fixable.
This is because you are using opaque schema.
So if you define your own schema you can got pass through this error.
It should even work for opaque schema.I am trying to find out will update as soon as i will discover it.
for now you can download the project file from
http://arpitrahi.wordpress.com/2009/09/23/mq-adapter-11g/
location .download and rename it as .zip and unzip.
Make sure you have qmanager and queue same as mine
Create a simple db adapter in 11g
I will be creating a simple db adpter in 11g which can be used to insert data in to a table.
I have uploaded the project in the following link
http://arpitrahi.wordpress.com/2009/09/22/hello-world/project1-3/#comment-2
You need to create connection pool and data source as i have already mentioned in my previous posts.
you will get a response page.It means your web service is tested.
Now go to sql and check if the data is inserted there or not.
then you need to create a table in database.
I have created a simple table
create table arpit(f_name char(20),l_name char(20));
then i will use db adapter to put some value in the table.
The result output will be like this

We need one more step in order to deploy this process.
Create a database connection.


Now log in to em console.
choose the project.
Click on test button you will get a page like this.Provide the input and say
Test Web Service at the right bottom

Now check the result in the sqlplus

The same steps can be followed for aq adapter also simply by creating the queues in database.
Tuesday, September 22, 2009
TCP Tunneling in SOA Suite
Tcp tunneling is a technology by which you can see the messages that are exchanged
between the different services.These services can be bpel or any web services.By the
help of this technique you can find the xml message(SOAP message) that are
commmunicated between the services i.e the request and response message.In net you can
find so many tools however SOA Suite provide its own tool which we will see to know
its functionality.
Tcp tunnel works in a concept of a broker,it just insert a listener in between the
end to end service so that the request now goes via the listener.So as soon as the
request/response comes to lisntener it displays the data as well as forward it to
the end service for which it is targetted.
In case of synchronous bpel process we need to set only one listener because the transaction request/reply happens in a single transaction.however in asynchronous bpel process we should have two listener as there are two transactions one for request and one for reply.
We will be using the tcp tunneling provided by default in SOA Suite BPEL
Go to the following directory
SOA_HOME\integration\orabpel\bin\obtunnel.bat
You will get a screen like this

By default it listen on port 1234.YOu can add your listener from the admin page
as follows

Now in deployment descriptor (bpel.xml) of the flow for which we want to see the SOAP message we need to a parameter "location".
This will cause the end point to be changed that is now the request will not go directly to the end point url but will go through the tcp listener.
If you have the following entry in the bpel.xml
<partnerLinkBinding name="SomeService">
<property name="wsdlLocation">
http://localhost:port/orabpel/default/SomeService/SomeService?wsdl
</property>
</partnerLinkBinding>
then we will be adding following property in it
<property name="location">
http://localhost:1234/orabpel/default/SomeService
</property>
the port number will be the number of port which you have configured for linstening
so now your bpel.xml should have entry like this
<partnerLinkBinding name="SomeService">
<property name="wsdlLocation">
http://localhost:port/orabpel/default/SomeService/SomeService?wsdl
</property>
<property name="location">
http://localhost:1234/orabpel/default/SomeService
</property>
</partnerLinkBinding>
Now compile and redeploy the project.
Now invoke the service from bpel console and you can see the SOAP message in the TCP Monitor.
So this is how you can see the request and reply message in case of synchronous bpel process however in case of asynchronous bpel process we need to have one more listener for receiving callbacks.
Again create one more listener listening on another port say 5678
Now GO to following location
$ORACLE_HOME/bpel/domains//config/domain.xml
<property id="optSoapShortcut">
<name>SOAP local optimization</name>
<value>true</value>
<comment>
and change the value of property opt-soap-shortcut from true to false.
Its definition says
Turns on "short-cut" for local SOAP request; local SOAP calls are normally done via an internal call instead of sending a message through the SOAP stack.
The default behavior for the engine is to optimize all. To disable optimization specify a value other than "true" or "yes"
So the reason is clear we dont want the internal call we want it to route via a tcp channel so we are setting it to false.
Now go to BPELAdmin console and change the following property
soapServerUrl
to http://localhost:5678
Keep in mind you have specified the port number used for callback request.
The hostname and port for this URL should be customized to match the hostname of your system and the port of your HTTP gateway which in our case is 5678.
Now restart the Bpel server.Invoke a asynchronous process and see the callback request.
between the different services.These services can be bpel or any web services.By the
help of this technique you can find the xml message(SOAP message) that are
commmunicated between the services i.e the request and response message.In net you can
find so many tools however SOA Suite provide its own tool which we will see to know
its functionality.
Tcp tunnel works in a concept of a broker,it just insert a listener in between the
end to end service so that the request now goes via the listener.So as soon as the
request/response comes to lisntener it displays the data as well as forward it to
the end service for which it is targetted.
In case of synchronous bpel process we need to set only one listener because the transaction request/reply happens in a single transaction.however in asynchronous bpel process we should have two listener as there are two transactions one for request and one for reply.
We will be using the tcp tunneling provided by default in SOA Suite BPEL
Go to the following directory
SOA_HOME\integration\orabpel\bin\obtunnel.bat
You will get a screen like this

By default it listen on port 1234.YOu can add your listener from the admin page
as follows

Now in deployment descriptor (bpel.xml) of the flow for which we want to see the SOAP message we need to a parameter "location".
This will cause the end point to be changed that is now the request will not go directly to the end point url but will go through the tcp listener.
If you have the following entry in the bpel.xml
<partnerLinkBinding name="SomeService">
<property name="wsdlLocation">
http://localhost:port/orabpel/default/SomeService/SomeService?wsdl
</property>
</partnerLinkBinding>
then we will be adding following property in it
<property name="location">
http://localhost:1234/orabpel/default/SomeService
</property>
the port number will be the number of port which you have configured for linstening
so now your bpel.xml should have entry like this
<partnerLinkBinding name="SomeService">
<property name="wsdlLocation">
http://localhost:port/orabpel/default/SomeService/SomeService?wsdl
</property>
<property name="location">
http://localhost:1234/orabpel/default/SomeService
</property>
</partnerLinkBinding>
Now compile and redeploy the project.
Now invoke the service from bpel console and you can see the SOAP message in the TCP Monitor.
So this is how you can see the request and reply message in case of synchronous bpel process however in case of asynchronous bpel process we need to have one more listener for receiving callbacks.
Again create one more listener listening on another port say 5678
Now GO to following location
$ORACLE_HOME/bpel/domains/
<property id="optSoapShortcut">
<name>SOAP local optimization</name>
<value>true</value>
<comment>
and change the value of property opt-soap-shortcut from true to false.
Its definition says
Turns on "short-cut" for local SOAP request; local SOAP calls are normally done via an internal call instead of sending a message through the SOAP stack.
The default behavior for the engine is to optimize all. To disable optimization specify a value other than "true" or "yes"
So the reason is clear we dont want the internal call we want it to route via a tcp channel so we are setting it to false.
Now go to BPELAdmin console and change the following property
soapServerUrl
to http://localhost:5678
Keep in mind you have specified the port number used for callback request.
The hostname and port for this URL should be customized to match the hostname of your system and the port of your HTTP gateway which in our case is 5678.
Now restart the Bpel server.Invoke a asynchronous process and see the callback request.
Threading in 10.1.3.3 SOA Suite
The concept of threading plays a vital role in 10.1.3.3 specially for performance issue ,the same is not applicable in 10.1.3.4 onwards
The most important thing that we have to keep in mind is the following concept
Sum of dspMAxThreads across all the domain should be less than the Receiver Threads
What does it mean?
It mean lets suppose you have three domains at your end
domain1,domain2 and domain3
the property can be found at
SOA_HOME/bpel/domains//config/domain.xml
Maximum active dispatcher threads
100
By default the value is 100.
So you need to check the dspMaxThreads for all the domain
and sum up them.Lets suppose it is 100 for each domain so sum of dsp max threads is
300.
So your receiver thread must be greater than or equal to 300
The receiver Thread can be found at following location
SOA_HOME/j2ee//application-deployments/orabpel/ejb_ob_engine/orion-ejb-jar.xml
ReceiverThreads
40
The default value is 40.It should be set to 300 atleast.
While configuring the threads we should start with some small values of dsp MaxThreads
dspMaxThreads property controls the number of instances created for Process 1....ProcessN for that particular domain.So increasing it will incrase the number of instance getting created in the domain.
however the receiverThreads determines how many active threads are there at a point of time so it makes sense to have this value greater than the sum of dspMaxthreads across all the domain.
One important thing to consider is that when ever we apply a patch
thee SOA_HOME\j2ee\oc4j_soa\application-deployments is saved as
SOA_HOME\j2ee\oc4j_soa\application-deployments.sav
and a new directory with same name as original is created
and so a new orion-ejb-jar.xml is created.
Hence when ever you apply a patch you need to remodify these things in order to work it properly.Most of the time it is the main performance issue so make sure you have tuned the threads properly.
With 10.1.3.4 onwards the threading model has changed so these changes are not required.
Infact in 10.1.3.4 the following properties are not there
dspMinThreads ,dspMaxThreads,dspInvokeAllocFactor
they have been replaced by following properties
dspInvokeThreads and dspEngineThreads
The relation ship now is different
dspInvokeThreads = dspInvokeAllocFactor * dspMaxThreads;
dspEngineThreads = dspMaxThreads - dspInvokeThreads;
From 11g not sure all these concepts have been removed as it is totally on weblogic container.
The most important thing that we have to keep in mind is the following concept
Sum of dspMAxThreads across all the domain should be less than the Receiver Threads
What does it mean?
It mean lets suppose you have three domains at your end
domain1,domain2 and domain3
the property can be found at
SOA_HOME/bpel/domains/
By default the value is 100.
So you need to check the dspMaxThreads for all the domain
and sum up them.Lets suppose it is 100 for each domain so sum of dsp max threads is
300.
So your receiver thread must be greater than or equal to 300
The receiver Thread can be found at following location
SOA_HOME/j2ee/
The default value is 40.It should be set to 300 atleast.
While configuring the threads we should start with some small values of dsp MaxThreads
dspMaxThreads property controls the number of instances created for Process 1....ProcessN for that particular domain.So increasing it will incrase the number of instance getting created in the domain.
however the receiverThreads determines how many active threads are there at a point of time so it makes sense to have this value greater than the sum of dspMaxthreads across all the domain.
One important thing to consider is that when ever we apply a patch
thee SOA_HOME\j2ee\oc4j_soa\application-deployments is saved as
SOA_HOME\j2ee\oc4j_soa\application-deployments.sav
and a new directory with same name as original is created
and so a new orion-ejb-jar.xml is created.
Hence when ever you apply a patch you need to remodify these things in order to work it properly.Most of the time it is the main performance issue so make sure you have tuned the threads properly.
With 10.1.3.4 onwards the threading model has changed so these changes are not required.
Infact in 10.1.3.4 the following properties are not there
dspMinThreads ,dspMaxThreads,dspInvokeAllocFactor
they have been replaced by following properties
dspInvokeThreads and dspEngineThreads
The relation ship now is different
dspInvokeThreads = dspInvokeAllocFactor * dspMaxThreads;
dspEngineThreads = dspMaxThreads - dspInvokeThreads;
From 11g not sure all these concepts have been removed as it is totally on weblogic container.
Monday, September 21, 2009
Timeout Issue in BPEL-SOA Suite
The different time out parameter in BPEL-SOA Suite are
transaction-timeout
It is defined at two places in the SOA Suite
SOA_Oracle_Home\j2ee\home\config\transaction-manager.xml
The change of transaction time out at this configuration file is made for container level transaction.We call it global transaction time out.
and another at
SOA_Oracle_Home\j2ee\home\application-deployments\orabpel\ejb_ob_engine\orion-ejb-jar.xml
The transaction timeout defined at this configuration file is for application level.This is called as bpel Mbean transaction time out.
There are other time out properties
syncMaxWaitTime
This is deined in following configuration files
SOA_Oracle_Home\bpel\domains\domain_name\config\domain.xml
This is specific to domains in the bpel and signifies time out for synchronous bpel process only.
As per the troubleshooting guide the best way to configure these can be summarised as
transaction time out(transaction-manager.xml)> transaction time out(orion-ejb-jar.xml)>syncMaxWaitTime(domain.xml)
So it says
Global transaction time out >bpel mbean transaction time out >syncMaxWaitTimeout.
We also have time out propery in apache.That is if your bpel process is taking more than 5 minutes of time you may get a 500 internal error this is because the transaction time out defined in SOA_HOME\apache\apache\conf\httpd.conf
it is by default set to 5 mintues so after 5 minutes it will time out.One can increase that according to his requirement but it is not recommended.If a process takes long time to complete better make this process as a asynchronous process.
We have one more time out parameter in bpel
This parameter is set at partner link level
Many a time we want the functionality that our partner link should call the external web service for some period of time and if doesn't get a response it just time out.
So we can define the time out property in partner link also.
Just open the partner link wizard and move to the propery tab

As can be seen in the diagram.
This time out proerty defines the number of second to wait before getting expired.
=====================================================
These configuration were there for oc4j container however if your applications are deployed on weblogic container,the changes have to done at different configuration files.
The global transactin time out we have the time out at domain level.
It can be done at follow locations
BEA_HOME\user_projects\domains\SOADomain\config\config.xml
here it is called as timeout-seconds
Again bpel Mbeans transactions time out can be done at following location.
BEA_HOME\user_projects\apps\soaApps\BPELPM\ejb_ob_engine.jar\weblogic-ejb-jar.xml
Here the time out property is trans-timeout-seconds
You need to change it for the mbeans
CubeEngineBean, CubeDeliveryBean and MessageBean.
The ejb_ob_engine.jar need to be unpacked to make the changes.Once changed these files need to be repacked again and have to be updated from weblogic console or start the container again.The default value for the transaction time out in these beans are 120
further the syncMaxWAitTimeOut it is to be modified in the same configuration file
SOA_HOME\bpel\domains\domain_name\config\domain.xml
but now the container is different making a change in domain.xml will not make an effect for the time out.So now you need to change this from bpel console.This probably is a shortcome and is covered in 11g.
To change it from console
1. Connect to the BPEL Console.
2. Click on 'Manage BPEL Domain' in the right side top of the screen.
3. Find the syncMaxWaitTime parameter.
4. Change the parameter value and apply.
so the next time if you get any time out error in your logs just make sure if you have checked all the configurations are correct
Monday, September 14, 2009
Trading partner in B2B
Trading partner is the third party application firm which communicates with other application or firm.
We have two concept of trading partner
The one which host the application is the host trading partner and the other at receiving end is the remote trading partner.
we need to have atleast two partner to communicate.
We need to define the business protocol the capabilities, agreement and transport protocol for the two trading partner to communicate with each other.
We will try to create a trading partner and see what all things are there in it.
so once you will open up the console
http://localhost:port/b2b you will get a page like this.

Click on partners and Trading partners
By default you will get MyCompany as the host trading partner.
Go back to the main page .Click on partners and then select create trading partner.
Provide some arbitraty name and say next

Next page you will find identification details which are required to identify the trading partner.YOu can just deinfe DUNS ID and say finish.
give some unique value and say finish
Once done you will come to operational capability page
There you need to define the business protocols.
business prtocol defines what is the document protocol,exchange protocol and process protocol.
We will check these things later first we will go back to the main page and click on partners and then trading partners.There now we can find two partners.

Now you can go to trading partner created and go to capabilities tab there you can add communication capability that defines the document type,document type revision,Channel,transport protocol,trasnport server.
It is very difficult to understand all these parameters and know how it works in the begining.
I will create a simple flow that will help in understanding how b2b works.Then we can do experiment on them to get more idea about the same.
B2B Installation
Installing infra


Installing Mid


Installing 101202 on top of mid tier
Before installing bpel on top of 101202 we need to unlock the account for orabpel schema and upgrade the orabpel schema to 10123 which is a prerequisite for installing bpel

Now login to the sqlplus with orabpel user and password and run the upgrade script

Check if the scripts have been run properly

Now go ahead with installation


Now for 10.1.2.0.2 we do not have a separate installer for jdev
So we have to install the standalone version of bpel 101202 which by default isntall the jdev 101202.


NOw next step is to install b2b
Again we need to unlock the account and change the password for the b2b

Now start the installation of B2b on top of mid


finally check if everything is running properly or not
