In any production server using JVM performance can be improved by tuning the JVM parameters particularly those parameters which are related to memory and garbage collections.
We will try to learn about some JVm parameters which should be taken care of while going in production.
Heap size
The heap is the runtime data area from which memory for all class instances and arrays is allocated. The heap may be of a fixed size or may be expanded. The heap is created on virtual machine start-up. If you have complicated algorithms or big caching which might create lot of objects in memory you may need bigger heap size.
YOu can use the following java code to find out the heap size.It is in case of a simple java programme.
public class getHeapSize {
public static void main(String[]args){
//Get the jvm heap size.
long heapSize = Runtime.getRuntime().totalMemory();
//Print the jvm heap size.
System.out.println("Heap Size = " + heapSize);
}
}
The allocation of memory for the JVM is specified using -X options.
for example if you are using sun JVM the parameters are
-Xms initial java heap size
-Xmx maximum java heap size
-Xmn the size of the heap for the young generation.
In my previous posts i have discussed about JVM in learning java,however we need to go much deep in to the jvm in order to undestand the concept of jvm tuning.We will once again look in to the structure of JVM and try to find out what goes inside and how to fine tune it.
JVM as we have seen earlier executes the byte code and generates the output.JVM is a virtual computer that resides in a physical computer as a software process.However to generate any output jvm uses several components.The main components of JVM Are
the stack, the garbage-collected heap, the registers and the method area.we will check each of them one by one.
STACK-Stack in a Java virtual machine stores various method arguements as well as the local variables of any method.IT contains three registers which help in the manipulation of the stacks.Stack also keep track of each and every method invocation.
The three registers are
Vars register-All the local variables that are used during a method invocation are stored in Vars register.
Frame register-It is used to maintain the operation of stack itself.
Optop register-Here the parameters for bytecode instructions are placed, and results of bytecode instructions are found.
==================================
Method area-It is the actual aread where the byte code resides.The JVM has a program counter which always points to the next instruction and keep track of the current execution.
==================================
Garbage collection heap-The java programmes are stored here.when ever we create an object the memory is taken from this heap only.Any local object reference resides on Stack but the actual object resides in Heap only. Arays are also objects so they are also stored in garbage collection heap.
In java you can use the following scrip to find out the
Used Memory:
Free Memory:
Total Memory:
Max Memory:
public class Movie {
public static void main(String [] args) {
int mb = 1024*1024;
//Getting the runtime reference from system
Runtime runtime = Runtime.getRuntime();
System.out.println("##### Heap utilization statistics [MB] #####");
//Print used memory
System.out.println("Used Memory:"
+ (runtime.totalMemory() - runtime.freeMemory()) / mb);
//Print free memory
System.out.println("Free Memory:"
+ runtime.freeMemory() / mb);
//Print total available memory
System.out.println("Total Memory:" + runtime.totalMemory() / mb);
//Print Maximum available memory
System.out.println("Max Memory:" + runtime.maxMemory() / mb);
}
}
Now we have some idea about the jvm we will dicuss about some jvm parameters and then we will check based on what criteria should we give values to them.
So depending upon your RAM size you have to assign values to the different parameters in your JVM.If your application runs on a single jvm or to make it more easy lets suppose your server uses a JVM and you want to assign it some values.If you have a ram og 2gb then you can have an initial heap size of 1gb.Please understand that there is no perfect settings for jvm.You have to do a lot of R &D in order to reach a correct setting.
As per sun recommendation the inital heap size and the maximum heap size must be the same. ie -Xms and -Xmx should be same.
The maximum heap size -Xmx controls how much memory the JVM can use. If your BPEL instance runs on a dedicated machine it can be set as high as the maximum memory space of your Operating System.
We have also talked about Eden space -Xmn.
It is the place where in short term process are stored as most of the process are short lived.So it should be 60-70% of the maximum heap size.
so having all these condition an ideal setting should be
-Xms2048m -Xmx2048m –Xmn1228m
This setting i have considered for a machine with 32 bit operating system linux box
The same settings can be applied in windows as 32 bit operating system in windows have a limitation for 2gb ,so if you don't have any other server or installation in your windows system then you can apply these changes.
If more than 2 cpu are getting used then one can go for aggressive heaping ,it is done by adding the following flag
-XX:+AggressiveHeap
This flag check the available memory and the number of processor associated with the machine automatically sets different properties for optimal performance.It works best in non windows environment.It does not have any effect on the performance of windows operating system.
So with all these setting the full configuration should be looking like
-Xms2048m -Xmx2048m –Xmn1228m -XX:+AggressiveHeap
Wednesday, December 30, 2009
Creating HL7 document
In this section we will be creating HL7 document.
One will be the request document and other will be the acknowledgement document.
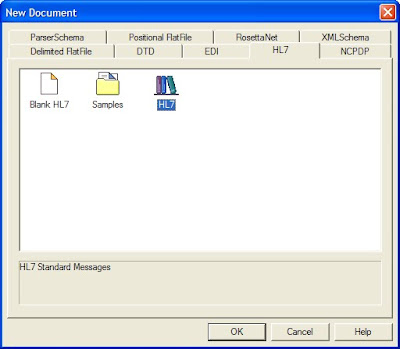
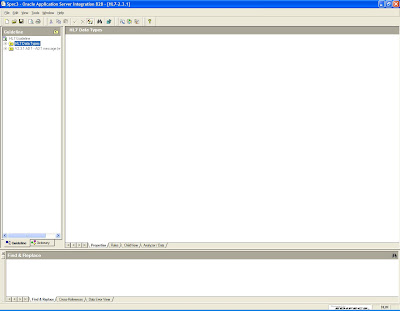
Again go to the Oracle B2b document Editor
In the left column slect new document
and choose HL7 folder
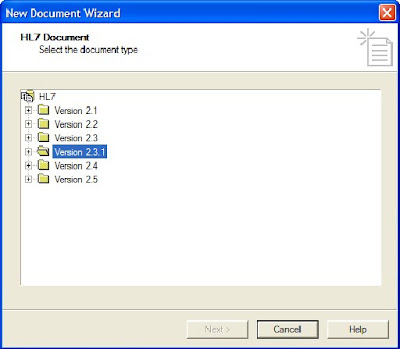
Now in the next window choose the version 2.3.1
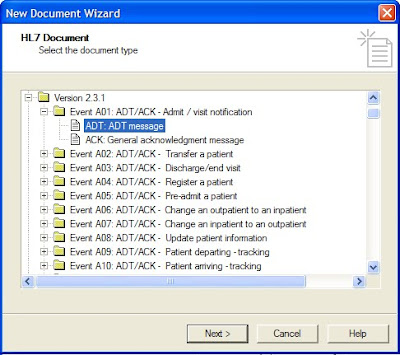
Expand the folder and choose Event A01:ADT/ACK-Admi/Visit Notification
and there in select ADT:ADT Message and say next
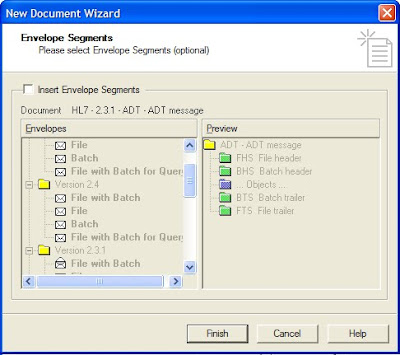
Now in the next window verify that the insert envelope segment is deslected and say finish.
Now check the document created.
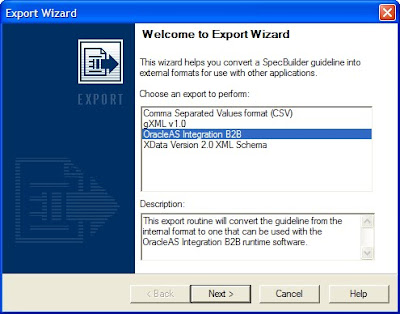
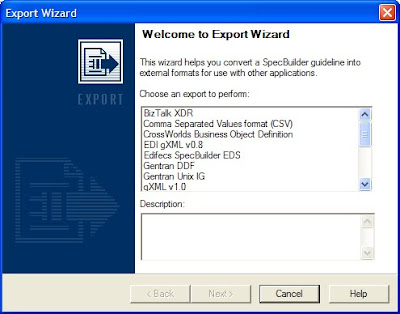
Now once the document is created .go to file menu and say export
In the export wizard select B2B as the export type and say next
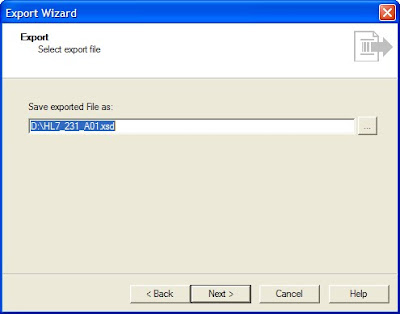
Now choose the folder location where you want to store your .ecs file and give it some logical name as HL7_231_A01.ecs

Say save and then the next window will come which will give the location and name for the xsd file.
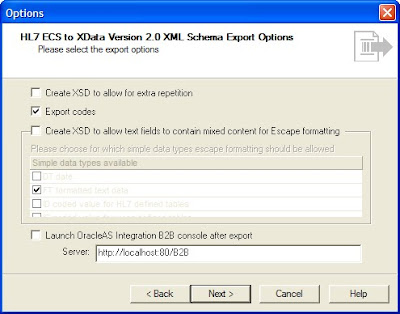
Say next and let the default seelction be there.Only deselect the last option to launch oracle integration b2b.
SAy next and then finish the wizard now verify the files .ecs and .xsd that are created in the folder structure provided by you.
Once these steps are completed do the same steps for the acknowledge document.REpeat the same step and provide some logical name to the acknowledge document.
One will be the request document and other will be the acknowledgement document.
Again go to the Oracle B2b document Editor
In the left column slect new document
and choose HL7 folder

Now in the next window choose the version 2.3.1

Expand the folder and choose Event A01:ADT/ACK-Admi/Visit Notification
and there in select ADT:ADT Message and say next

Now in the next window verify that the insert envelope segment is deslected and say finish.

Now check the document created.

Now once the document is created .go to file menu and say export
In the export wizard select B2B as the export type and say next

Now choose the folder location where you want to store your .ecs file and give it some logical name as HL7_231_A01.ecs

Say save and then the next window will come which will give the location and name for the xsd file.

Say next and let the default seelction be there.Only deselect the last option to launch oracle integration b2b.

SAy next and then finish the wizard now verify the files .ecs and .xsd that are created in the folder structure provided by you.
Once these steps are completed do the same steps for the acknowledge document.REpeat the same step and provide some logical name to the acknowledge document.
Creating RosettaNet PIP3A4 document
In this section we will be creating a purchase order request and a purchase order confirmation for Rosettanet.
Again go to spec builder.In the left column select new document to start the new document wizard,there in select Rosettanet and then choose the pip3A4 and say ok
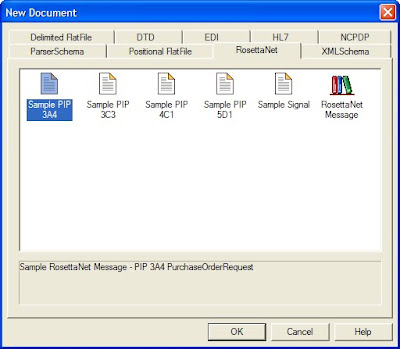
The following document will be created once you will say ok
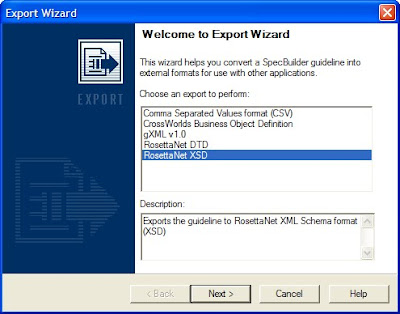
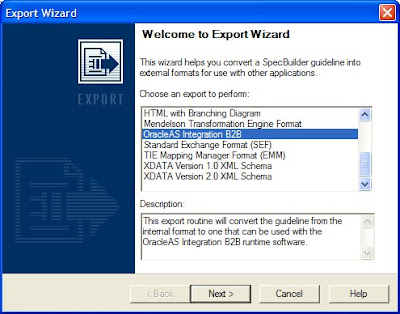
Now again go to file menu and select export,there you choose the RosettaNet XSD as the export type
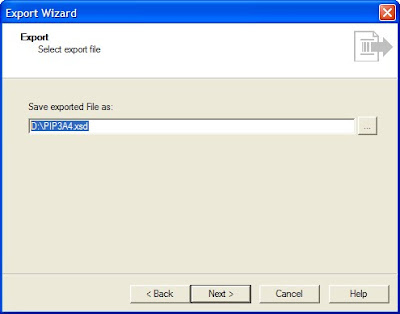
Say next and choose the directory where you want to save the .xsd file.Please provide it a logical name as i have provided it as PIP3A4.xsd
Say next and choose all the default options provided.
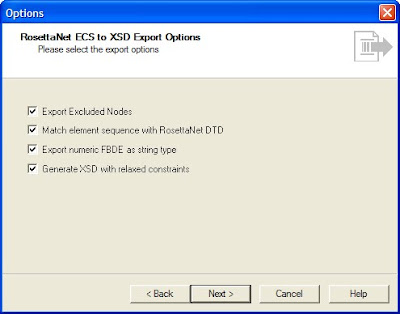
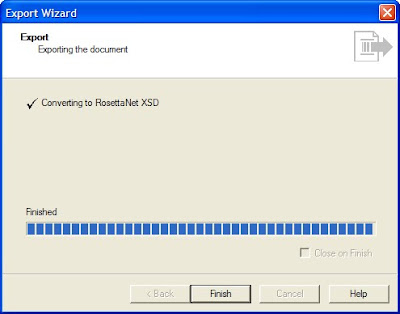
SAy next and the document will be created as shown below.Once it is created say finish.
Now verify in the folder location if you have the .xsd file created at that place.
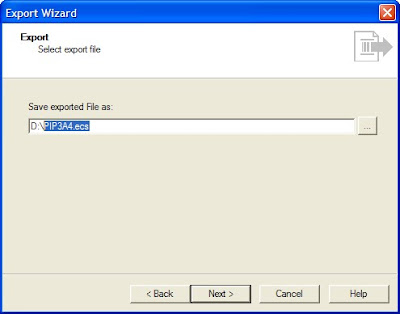
Now again go to the document say export and choose Rosettanet XSD this time save the exported file as PIP3A4.ecs
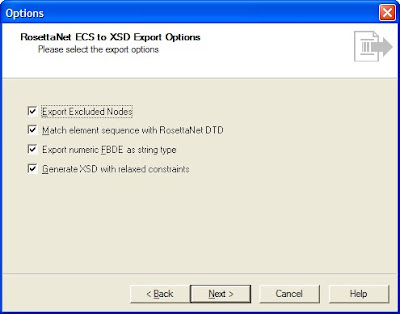
Say next and choose all the options
The document gets create say finish and exit the wizard.Then check in the folder locatin whether the required file is created or not.You can also escape this second phase of creating the ecs file and directly close the document created which will ask for an option to save it before closing.You can give the file name as PIP3A4.ecs and save it as .ecs file.
This step was done to create purchase order you have to repeat the same process to create the purchase order confirmation document in both the trading and host partner.
Again go to spec builder.In the left column select new document to start the new document wizard,there in select Rosettanet and then choose the pip3A4 and say ok

The following document will be created once you will say ok

Now again go to file menu and select export,there you choose the RosettaNet XSD as the export type

Say next and choose the directory where you want to save the .xsd file.Please provide it a logical name as i have provided it as PIP3A4.xsd

Say next and choose all the default options provided.

SAy next and the document will be created as shown below.Once it is created say finish.

Now verify in the folder location if you have the .xsd file created at that place.
Now again go to the document say export and choose Rosettanet XSD this time save the exported file as PIP3A4.ecs

Say next and choose all the options

The document gets create say finish and exit the wizard.Then check in the folder locatin whether the required file is created or not.You can also escape this second phase of creating the ecs file and directly close the document created which will ask for an option to save it before closing.You can give the file name as PIP3A4.ecs and save it as .ecs file.
This step was done to create purchase order you have to repeat the same process to create the purchase order confirmation document in both the trading and host partner.
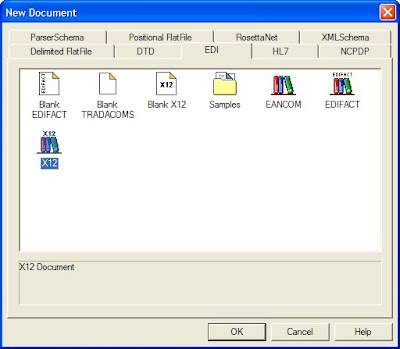
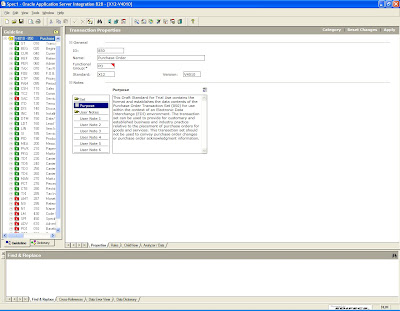
Working with Spec Builder-Creating EDI-X12 document
In EDI x12 850 is the code for a purchase order similarly 997 is the functional acknowledge ment in EDI-x12.
We will be creating a document for EDI purchase order(850) and EDI functional acknowledgement.
OPen the B2b document Editor also known as spec builder.
In the left column select the new document tab to create a new document.
YOu will get a window like this.Just select EDI x12 from there and say ok
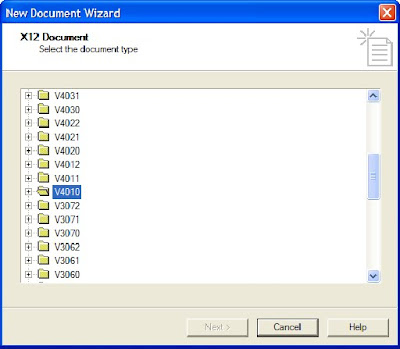
ONce you will say ok you will get a list of folders.These are the different versions of the EDI - x12 document.We will select here v4010
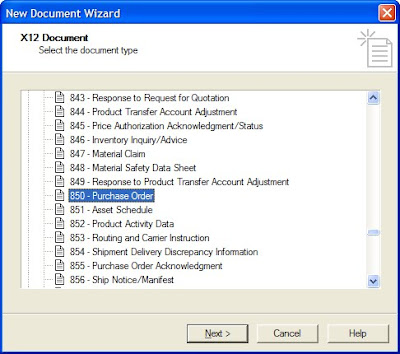
Expand the folder and select 850 purchase order from there.
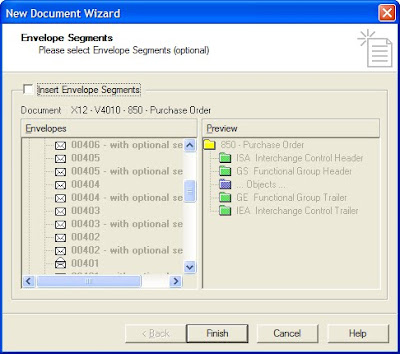
Then say next and verify that the insert envelope segment check box is deselected and then say finish.
You will get a screen like this.
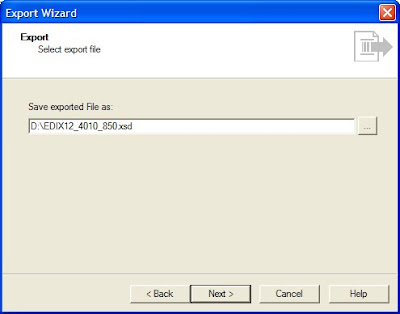
Now go to the file menu option and say export.
YOu will get a window like this
Now choose Oracle B2B type to export the document as shown and say next
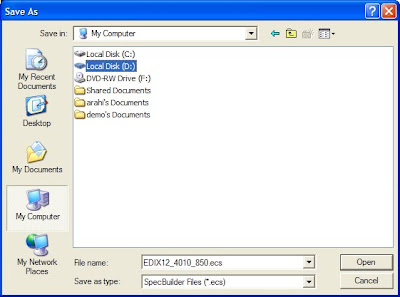
Now just save the ecs file and the xsd file in some specific location from where you can easily retrieve them.Please provide some logical name to the files.As i have provided it as EDIX12_4010_850.ecs
Also save the xsd file created for the same document
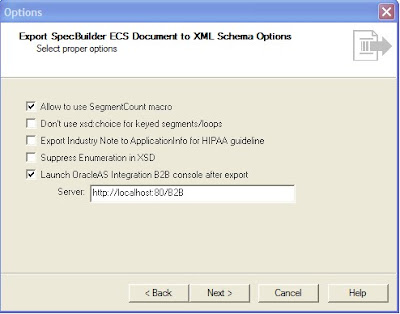
Then say next and let the default option be selected
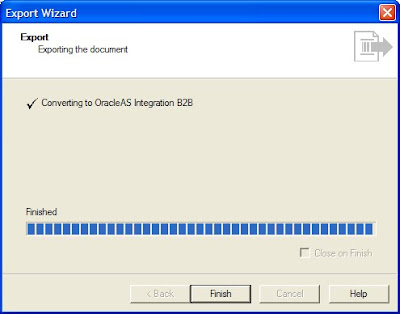
Say next and then finsih the wizard and verify in the directory structure if both the files have been created succesfully.
In a similar way you can create the document for the 997 that is functional acknowledge ment from the EDI-x12 for 850 purchase order.YOu can again give it some logical name EDIX12_v4010_997 or as per your ease.
We are creating these document because we will be checking the functionality that how b2b 11g works and how it communicates.so the same stpes have to be followed in another machine also.In b2b we generally have one host and one remote trading partner so you have to follow these stpes both the host and the remote trading partner.
We will be creating a document for EDI purchase order(850) and EDI functional acknowledgement.
OPen the B2b document Editor also known as spec builder.
In the left column select the new document tab to create a new document.
YOu will get a window like this.Just select EDI x12 from there and say ok

ONce you will say ok you will get a list of folders.These are the different versions of the EDI - x12 document.We will select here v4010

Expand the folder and select 850 purchase order from there.

Then say next and verify that the insert envelope segment check box is deselected and then say finish.

You will get a screen like this.

Now go to the file menu option and say export.
YOu will get a window like this

Now choose Oracle B2B type to export the document as shown and say next

Now just save the ecs file and the xsd file in some specific location from where you can easily retrieve them.Please provide some logical name to the files.As i have provided it as EDIX12_4010_850.ecs

Also save the xsd file created for the same document

Then say next and let the default option be selected

Say next and then finsih the wizard and verify in the directory structure if both the files have been created succesfully.

In a similar way you can create the document for the 997 that is functional acknowledge ment from the EDI-x12 for 850 purchase order.YOu can again give it some logical name EDIX12_v4010_997 or as per your ease.
We are creating these document because we will be checking the functionality that how b2b 11g works and how it communicates.so the same stpes have to be followed in another machine also.In b2b we generally have one host and one remote trading partner so you have to follow these stpes both the host and the remote trading partner.
Tuesday, December 29, 2009
Oracle Weblogic Server
We will now see how to set up a cluster in weblogic 10.3 but before that we need to have some concepts about the terms and terminology in weblogic.
WEblogic is an Enterprise J2EE Server which provides higher reliability,Availability, Scalability and Performance.
Few important terms in weblogic
A domain in a weblogic server is a group of instances and clusters under one single control.Domains contains a WebLogic Server instance called the Administration Server we also called in short it as admin server.This is the main place from where we control and manage all the resources in a domain. We also create our own weblogic instances called as managed server.We deploy our application in the managed server and from admin server we configure and monitor them.We have a terminology called cluster within a domain which is nothing but group of managed servers to provide increased scalability and reliability to the end users.Also we have node manager which is a process to start/stop and auto restart the managed server.so essentially our domain consist of one admin server, one or more managed server,one node manager and one or more cluster.
Again a server in weblogic can be a standalone server or it can be a part of a cluster.All Managed Servers in a cluster must reside in the same domain i.e. you cannot split a cluster over multiple domains.
If you have created multiple domains in weblogic, then each domain must point to its own database schema. You cannot share a configured resource or subsystem between domains. For example, if you create a JDBC data source in one domain, you cannot use it with a Managed Server or cluster in another domain.You must create a similar data source in the second domain.
When a Managed Server starts, it connects to the Administration Server to check the data maintained by the admin server.so whenever a configuration is changed the admin server sends the changed configuration to the managed servers.
Weblogic scripting tool(WLST)
WLST is a scripting language based in jython.It is a Scripting tool for administering a domain (create, configure, manage, monitor, deploy applications).We have a record feature in admin console of weblogic.This records the data in the form of wlst scripts.There are two modes of WLST script
1>Offline WLST
With offline WLST you can create a domain template,or create a domain based on existing template without connecting to the server.
2>Online WLST
WLST online is a Java Management Extensions (JMX) client.With online WLST you can connect to a running admin server,manage the configuration of a domain and check its performance data.
NOde Manager
Node Manager is a WebLogic Server utility that enables you to start, stop, and restart Administration Server and Managed Server instances from a remote location. It is not associated with a domain but with a machine.
Machine is nothing but a logical name for a computer to associate it with its managed server.
Again one important feature of weblogic is jrockit.It is developed to optimize performance on Windows and Linux only.It is BEA's version of JVM.YOu can also use SUN's JVM.
Now in weblogic for a domain the most important configuration file is config.xml which is the central configuration file for a domain.
How to set up BPEL cluster
In my previous posts i have discussed how to set up an applicaiton server cluster.I have missed the part how to configure the bpel cluster.
I will start from the point that you have SOA Suite installed on two different machines and you have oc4j_soa container on both the hosts.
Both the container or SOA suite should have the same dehydration store.Now just install bpel process manager on both the host on top of the container oc4j_soa.
Once bpel is installed on both the node you need to do the following in order to set up a bpel cluster.
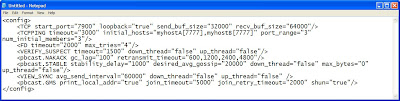
Go to SOA_Home/bpel/system/config/collaxa-config.xml file
Set the "enableCluster" property to "true" for all BPEL nodes in the cluster.
Set Value of the "clusterName" property to "Load-balancer host:port", which needs to be the same for all bpel nodes in a cluster in order for them to find each other
It will be more clear from this diagram
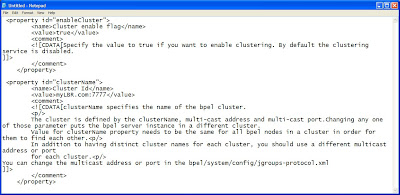
As you can see we have set the "enableCluster" property to "true"
and in the Load balancer host and port number i have define the value myLBR.com:7777
here myLBR.com is my host name for the load balancer and 7777 is the port number in which my load balancer is running.Oracle provide web cache as a load balancer however you can have some other load balancer like pen or you can have hardware load balancer like bigip but hardware load balancer are too costly in comparison to software one.
Once these settings are don save the file and exit now go to the following directory
SOA_Home/bpel/system/config/jgroups-protocol.xml file.
If nodes are on the same subnet, use UDP multicast method. mcast_port and mcast_addr properties must be the same for all nodes in the BPEL cluster.
As you can see in the following diagram
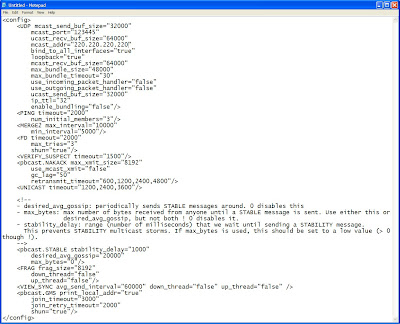
Here mcast port
mcast_port="123445"
value should be same in all the nodes of the cluster i.e. if we have two bpel nodes then in both the nodes we should have the same value for the mcast_port number.
Same applies for the mcast address.
mcast_addr="220.220.220.220"
A multicast group address is an ip address in the range 224.0.0.0 to 239.255.255.255 that identifies the members of an IP multicast group.It broadcast the same message to all members of an IP multicast group,In a cluster we give the same multicast address to all the nodes so all the nodes becomes a member of the multicast group and the messages are trasnmitted to all of them.
It should also be same in both the nodes of the cluster.
If the nodes are on different subnet you should use TCP protocol.I have often experienced that udp protocol gives issues so i would prefer to use TCP protocol even if both the hosts are on same subnet or in different.So in tcp protocol you will configure something like this.
here initial_hosts="myhostA[7777],myhostB[7777]" these are the two host which runs on 7777 port.
Now go to the following path
SOA_Home/bpel/system/config/collaxa-config.xml file.
Set "soapServerUrl" and "soapCallbackUrl" properties to loadbalancer url:port.YOu can also change the same from BPELADmin console also.Once done save the changes and now try to open the BPEL console from the loadbalancer url and port.
Check the functionality of the cluster by deploying a simple bpel process in one node and by default it should get reflceted in both the nodes.
Also try to bring fown one node and check if the console and processes are accessible.
I will start from the point that you have SOA Suite installed on two different machines and you have oc4j_soa container on both the hosts.
Both the container or SOA suite should have the same dehydration store.Now just install bpel process manager on both the host on top of the container oc4j_soa.
Once bpel is installed on both the node you need to do the following in order to set up a bpel cluster.
Go to SOA_Home/bpel/system/config/collaxa-config.xml file
Set the "enableCluster" property to "true" for all BPEL nodes in the cluster.
Set Value of the "clusterName" property to "Load-balancer host:port", which needs to be the same for all bpel nodes in a cluster in order for them to find each other
It will be more clear from this diagram

As you can see we have set the "enableCluster" property to "true"
and in the Load balancer host and port number i have define the value myLBR.com:7777
here myLBR.com is my host name for the load balancer and 7777 is the port number in which my load balancer is running.Oracle provide web cache as a load balancer however you can have some other load balancer like pen or you can have hardware load balancer like bigip but hardware load balancer are too costly in comparison to software one.
Once these settings are don save the file and exit now go to the following directory
SOA_Home/bpel/system/config/jgroups-protocol.xml file.
If nodes are on the same subnet, use UDP multicast method. mcast_port and mcast_addr properties must be the same for all nodes in the BPEL cluster.
As you can see in the following diagram

Here mcast port
mcast_port="123445"
value should be same in all the nodes of the cluster i.e. if we have two bpel nodes then in both the nodes we should have the same value for the mcast_port number.
Same applies for the mcast address.
mcast_addr="220.220.220.220"
A multicast group address is an ip address in the range 224.0.0.0 to 239.255.255.255 that identifies the members of an IP multicast group.It broadcast the same message to all members of an IP multicast group,In a cluster we give the same multicast address to all the nodes so all the nodes becomes a member of the multicast group and the messages are trasnmitted to all of them.
It should also be same in both the nodes of the cluster.
If the nodes are on different subnet you should use TCP protocol.I have often experienced that udp protocol gives issues so i would prefer to use TCP protocol even if both the hosts are on same subnet or in different.So in tcp protocol you will configure something like this.

here initial_hosts="myhostA[7777],myhostB[7777]" these are the two host which runs on 7777 port.
Now go to the following path
SOA_Home/bpel/system/config/collaxa-config.xml file.
Set "soapServerUrl" and "soapCallbackUrl" properties to loadbalancer url:port.YOu can also change the same from BPELADmin console also.Once done save the changes and now try to open the BPEL console from the loadbalancer url and port.
Check the functionality of the cluster by deploying a simple bpel process in one node and by default it should get reflceted in both the nodes.
Also try to bring fown one node and check if the console and processes are accessible.
Monday, December 28, 2009
Proxy configuration in BPEL
Before understanding the porxy we must understand what a firewall mean.A firewall is a part of a computer system or network that is designed to block unauthorized access while permitting authorized communications. It is a device or set of devices configured to permit, deny, encrypt, decrypt, or proxy all (in and out) computer traffic between different security domains based upon a set of rules and other criteria.Proxt setting is one of the type of firewall techniques.
For enterprise customers it is important to be able to set up secure computing environments within their companies, and proxy configuration is an essential part of doing that. Proxy configuration acts as a security barrier, it ensures that the proxy server monitors all traffic between the Internet and the intranet. This is normally an integral part of security enforcement in corporate firewalls within intranets.
Lets suppose i have to access a bpel process that is running on a different network.Then i can not enter into any network i have to enter into that network through the proxy server.The proxy server will check if i have the proper authority to access the page,this may be based on some filter criteria also like it may filter by ip address.so once it will allow then only i can access the process.So proxy server is basically used to protect the internal process to be exposed to outside world.
To configure the Ant tasks and the Oracle BPEL Process Manager to use an http proxy
server you need to do the following
set OB_JAVA_PROPERTIES in SOA_HOME\orabpel\bin\obsetenv.bat
By defulat you will get the properties set to
set OB_JAVA_PROPERTIES="-Dhttp.proxySet=true" "-Dhttp.proxyHost=[HTTP_PROXY_HOST]" "-Dhttp.proxyPort=[HTTP_PROXY_PORT]" "-Dhttp.nonProxyHosts=[HTTP_NON_PROXY_HOSTS]"
YOu just need to provide the right details for the host and port
eg-
set OB_JAVA_PROPERTIES="-Dhttp.proxySet=true" "-Dhttp.proxyHost=myproxy.ora.com"
"-Dhttp.proxyPort=8090" "-Dhttp.nonProxyHosts=arahi.ora.com"
By setting http.proxySet to true, you activate the client proxy and redirect all the
outbound traffic through http.proxyHost and http.proxyPort. By setting the http.nonProxyHosts
to the server which hosts the BPEL server you prevent the local request from going
through the proxy. You might want to consider expanding the nonProxyHosts list to
include other servers inside your corporate network or other logical names for the
arahi.ora.com machine by using | as a delimiter.
here is our example we have the prooxy server myproxy.ora.com which runs on port 8090.Lets suppose i have a local network arahi.ora.com and i want to access some web service from a different network then all the request will be routed by this proxy server and port number.Since we have also defined that
-Dhttp.nonProxyHosts=arahi.ora.com
so our local request will not be routed to outside world.
How to set up JMS adapter for Oracle JMS
The J2EE Connector architecture defines a standard architecture for connecting the J2EE platform to heterogeneous Enterprise Information Systems (EISs).A resource adapter is a system-level software driver used by an application server or an application client to connect to an EIS.Here we will be creating a resource provider and try to connect to the underlaying appliactions.
To set up a jms adapter for oracle you first need to configure your resource for the connectivity.YOu need to go the the following directory.
SOA_HOME/j2ee/instance_name/config /application.xml
there you will find a line
data-sources path=”data-sources.xml”
we must take the bakcup for the file before making any changes.
SO now open the file and add follwing lines
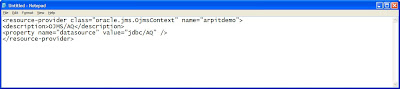
Here arpitdemo is just the name of the resource you can name it any thing as per your wish or requirement.
jdbc/AQ points to the datasource configuration which is used for this resource provider.
So now we will make a corresponding entry in our datasource configuration for this resource provider.Go to the following
SOA_HOME/j2ee/instance_name/config /data-sources.xml
Take the backup of data-source.xml file and now try to modify it.
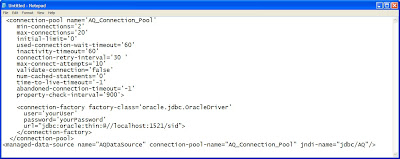
Add the following entry in to the data-sorce.xml

Save the file
In this datasource configuration
the jndi name that we have provided is the same that we have defined for our resource provider.
Replace with your Oracle Database SID. replace "yourUser" and "yourPassword" with your AQ user/password Save and exit.
now we need to make an entry in our oc4j-ra.xml file for the implementation.oc4j-ra.xml is the OC4J specific deployment descriptor for a resource adapter.
Now go to the following location
SOA_HOME/j2ee/OC4J_BPEL/application-deployments/default/JMSAdapter/oc4j-ra.xml
Again make a backup of the file and make an entry in the oc4j-ra.xml as
Here the arpitdemo resource is the one that we created earlier in application.xml. It is represented above as “java:comp/resource/arpitdemo/QueueConnectionFactories/myQCF”. The name myQCF is a user-defined name, and can be anything. We need to provide the username/password correctly.
Then save the change and restart your server to implement the changes.
To set up a jms adapter for oracle you first need to configure your resource for the connectivity.YOu need to go the the following directory.
SOA_HOME/j2ee/instance_name/config /application.xml
there you will find a line
data-sources path=”data-sources.xml”
we must take the bakcup for the file before making any changes.
SO now open the file and add follwing lines

Here arpitdemo is just the name of the resource you can name it any thing as per your wish or requirement.
jdbc/AQ points to the datasource configuration which is used for this resource provider.
So now we will make a corresponding entry in our datasource configuration for this resource provider.Go to the following
SOA_HOME/j2ee/instance_name/config /data-sources.xml
Take the backup of data-source.xml file and now try to modify it.
Add the following entry in to the data-sorce.xml

Save the file
In this datasource configuration
the jndi name that we have provided is the same that we have defined for our resource provider.
Replace
now we need to make an entry in our oc4j-ra.xml file for the implementation.oc4j-ra.xml is the OC4J specific deployment descriptor for a resource adapter.
Now go to the following location
SOA_HOME/j2ee/OC4J_BPEL/application-deployments/default/JMSAdapter/oc4j-ra.xml
Again make a backup of the file and make an entry in the oc4j-ra.xml as

Here the arpitdemo resource is the one that we created earlier in application.xml. It is represented above as “java:comp/resource/arpitdemo/QueueConnectionFactories/myQCF”. The name myQCF is a user-defined name, and can be anything. We need to provide the username/password correctly.
Then save the change and restart your server to implement the changes.
Friday, December 18, 2009
Task Manager and Task Action handler
The TaskManager or TaskActionHandler processes are the default process which gets deployed in to your bpel server when we install the SOA Suite however in many cases these process in Oracle BPEL Control fail to deploy after installing Oracle Application Server or after upgrading.
YOu can find the following issues along with this like
The domain.log file present in SOA_HOME/bpel/domains/default/logs will give compilation error and xml parser error.
Either the TaskManager or TaskActionHandler or may be both will not appear in the bpel console
Http://localhost:port/BPELConsole.
or a third case is when you will have the .jar files in failed state.
In that case file named bpel_TaskManager_1.0.jar.failed or bpel_TaskActionHandler_1.0.jar.failed will be present in the ORACLE_HOME/bpel/domains/default/deploy directory.
TO overcome this issue
Navigate to
SOA_HOME/bpel/domains/default/deploy folder and there change the
bpel_TaskManager_1.0.jar.failed to bpel_TaskManager_1.0.jar
and bpel_TaskActionHandler_1.0.jar.failed to bpel_TaskActionHandler_1.0.jar
Once done restart your server and these process will be automatically deployed in the server.
Now you will be able to see both the process in the bpel console.
One more thing that we have captured here is if we will copy any jar file in the
SOA_HOME/bpel/domains/default/deploy location it will be automatically deployed to the bpel server when it will start because it is the default location used by bpel process manager to deploy the process while starting.
Monday, December 14, 2009
Learning JAVA
To undestand BPEL/ESB it is recommended to have a good knowledge of java,xml and j2ee server.YOu need not be a bond in all the three but you should have the concept about all the three to get an inner view of the process.
I will try to explain java in my words.
JAva as everyone of us knows is a programming language which is derived from c++.
It is an object oriented programming language.
Object-oriented programming (OOP) is a programming pattern that uses "objects" – data structures consisting of datafields and methods together with their interactions – to design applications and computer programs.
Java is generally referred to as java programming language.The java Virtual machine,java api and java class file work together to make the java phemonenon possible.Java is a robust language and is platform independent.Platform independent mean write once and execute any where.Once you have written the java code you can run it in any where jre is available.
We have discussed that the java architecture consist of four specification.
1>Java programming language.
2>Java class file format.
3>Java application programming interface(java API)
4>Java virtual machine.
Now we will check both the compile-time environment and run-time-environment
Compile time environment
Programme.java -àcompiler àProgramme.class
We have written a simple programme called Programme.java.
The compiler convert it into byte code Programme.class.
This is the only function that took place in compiler.
Now you have the class file so you can execute it in any platform.
It can be on local machine or it can be transferred to another system.
Run-time environment
Run time consist of java api and java virtual machine.The java api and jvm together is also called as java platform.When we write Java programme it access system resources by calling methods in the class which implements java api(example string.class, object.class) .
The class file that we have created “Programme.class” and the class file which implement java api together enters the java virtual machine which acts as an interpreter and execute the byte code to fetch the result.
So finally it comes to JVM.Now we will try to peep inside the JVM what it is and what it does.
Java virtual machine is an abstract computer.Its main job is to load the class files and execute the byte code.JVM contains a classloader and a execution engine.The classloader loads your programme class file and the class file from java api it converts it into byte code and then execution engine execute the byte code.
A simple execution engine acts as an interpreter which executes the byte code one by one,however we have another execution which is much faster than the simple execution engine ,it is just in time compiler or JIT.In this scheme the byte code is converted to native machine code the first time the method is invoked it is then cached so that the next time the code is invoked it can be directly loaded.So it will save time and the execution will be much faster.Now we will check each of the component individually.
Class loader-When a class file run it may need other class files also to perform its execution.These class files are loaded by the class loader in JVM.The class file may be present in the local system or may be in the network.The JVM uses the classpath to point to these class variables.The classpath can be added by using java –cp or java –classpath command.
Example- java –cp c:\jdk_home\jre\lib\tools.jar
One class files are loaded it goes to verification phase where in it check whether the java code fulfills the basic rules of java.This step ensure that no illegal actions are performed.
The jvm act as byte code interpreter that execute the byte code for the loaded class.The JVM keeps track of the memory so once the execution is completed and jvm finds that the object is no longer required.It marked the instace for garbage collection..Thus it manages memory also.Essentially in real application a jvm instance start running by calling the main() method .The main method must be public ,static,return void,and accept once parameter a string array.We will check these details later.This is infact very confusing in java as most of the things are interrealated and we can not have all the concepts at a single time so we will check these in our order.
Java-Object Oriented Programming
An object is a run time representation of a thing.Object oriented programming approach ensures that the programme survives the changes in the changing world and changing business needs.An object is an idividual entity which can be changed without changing the whole application.In shor we can say it is adaptable and reusable.It also defines the term abstraction,encapsulation,inheritance and polymorphism.I will cover it as soon the lesson will proceed.
JDK-Java development kit
The java development kit provides following
1>Compiler that is javac which is used to compile the java code.
If we have a programme movie.java then we will compile it by following command
Javac movie.java
This will create the byte code for the movie code called movie.class.
2>It provides the core class library.The library contains all the class files which are required for the execution of a programme.The jdk provide the library in the form of rt.jar file.
3>Debugger-It provides a debugger which helps in debugging ,finding the real place of error with the exact error messages.In JDK the debugger provided is jdb.
4>Byte code interpreter or jvm-IT interpret the byte code.
5>Documentation generator-Provide opportunity to create the java doc representing the structure of class files in the programme.
6>Java archieve utility-Several class files can be bunched together to form a jar file out of it.
Different edition of java
Java,Micro Edition-Used for small applications like smart cards,pagers,mobile etc.
Java Platfrom Standard Edition-Development environment for internet applications
Java Platform,Enterprise Edition-For implementation in application server.
Integrated development Environment
IDE is a tool which is used now a days to write your programme.It has many components which helps us in writing our code easily.It has some prebuilt code and other faciliteis which helps in decreasing the real time of creating an application code.
Most commonly used IDE is eclipse and jdeveloper.However we will be using jdeveloper for illustration.Again covering jdeveloper is a vast topic so I will directly go inside programming concept.You can write the same code in notepad and save and compile it using your command prompt.
Programming
To Start with programming in java we first of all need to know what is an object and what is a class.
We will try to understand the concept with the following example.Let suppose we want to construct a house.We might be having lot of ideas in our mind but we can not go with the same idea to construct a real house as physically the implemetation will be very different.So we need to model an architecture for the building i.e we need to first create map which covers all the essential details like how much materila will be used,what will be the cost and all other important details.
In java the class does the same work.It is the blueprint which defines the object.So essentially a class contain several properties and methods.
Now once the blue print or map is ready one can go ahead with this and implement the map in to physical existence.
In java objects do the same work.They use the class to retain there structure and behaviour to perform the task.
Understanding variable and methods
Lets suppose we have a pen then what can be attribute and functionality of the pen.The attribute may be lead colour,brand name,ink quantity and the methods can be to write.
In a similar way a class have variable and methods which together defines the attributes and functionality of the class.
As we have seen an object is basically derived from class.The object must be referenced to work with it.In java we create an object using the new command.
So if we have a Movie class we can create a object of movie class by following method
Movie obj=new Movie();
Here obj is our object and the new operator is used to create an object for a class.The object “obj” contains the reference for the newly created object of the movie class.
Let suppose our movie class has some methods.
How one will execute this method.They have to be called from the object
So if we have a method called rating() in our movie class it can be invoked by the object in the following way.
Call method from object- obj.rating()
As we have discussed the object has a reference.Its values are stored in the memory as a hashcode value.We will check it once we will get in to the details of programming.
As we have seen in our real world example we need to have a map in order to construct a house then only physical implementation tooks place.So this map can be used to create many other physical implementation.It can be implemented in the similar way by some other or can be changed in some way by others.Similarly in java a class can have multiple instance(objects).So we got the following idea about the class and object.A class is a template for the objects.A class defines variables and methods for all the instances of the class.
Now we will check some important terminology and concepts of oops(object oriented programming langauge).Java is called as an object oriented programming langague.The reason I am covering these definiton later is that I wanted to present an idea of object before getting in to what an object oriented programming languge mean.
Encapsulation
Encapsulation allows you to ignnore the low level details of how the object is structured and how it works internally.Lets take example of a television.We are not bothered about how it works internally.We only need to know how to start it and close it that is through interfaces provided like remote but we are not at all bothered how the lcd of tv works how it gets signal from antenna.These low level details are not required by us.Lets suppose the television company changes the software internally but still the interfaces are same that is still remote is same.So encapsulation hides the internal structure and operation of an object behind an interface.In our example television is an object and remote is the interface.
Inheritance
We often come across words saying that guy has inherited most of his father’s style or something like that.What exactly it mean.It mean that both the father and the son have commonality in them.Similary in java one class can inherit the other class.The class which is inherited is called as superclass and the one who inherit it is called as subclass.
A subclass is a kind of superclass.Now lets dig more in to it in terms of java ,Lets suppose we have a class called “two wheeler” as clear from the name,This class contain variables like wheel,gear,brakes and methods run stop.Now any other classes like herohonda,yamaha should be a subclass for the “two wheeler” class as “two wheeler” class is the superclass which defines all the basic format for a two wheel vehicle so it does not depend whether it is a herohonda motorcycle or a yamaha ,they have to have the brakes,gears and methods to run ,stop.But herohonda or yamaha can have there extra variable and methods in addition to the methods and variables defined in super class,i.e.
Herohonda can implement its own quickstart method,yamaha can have its own lighting on-off mechanism.So a subclass object should have all the variables and methods of a superclass object and in addition it can have its own methods and variables.
Polymorphism
Polymorphism means many forms.It means one operation can be perfomed by different methods or different ways.Suppose we have three person A,B and C all of them go to office by their own convenient way.A prefers to walk ,B uses motorcycle and C uses a Car.One important requirement of polymorphism is that same operation should be called for all the objects.So in our case if we issue an operation go to office then for the three person A,B and C the operation will be same but the way of going to office is different.
So Essentially a polymorphism requires that an object should send same message to different objects,enabling different objects to repsond in their own way.Polymorphism requires that the different objects implementing the same operation must have same semantics.In java we use the concept of polymorphism in overloading and overriding.
For the time being overloading a method mean using the same semantics but with different parameters to call a method and over riding means the sub class defining the same method in its own term as in the superclass.Java does not support operator overloading .Opearator overloading is supported only for + operator.
We will be covering all these definition later also when we will start programming.
Java Package
In java certain classes are grouped together in to a package as per their functionality.For example
Java.lang –contains all language functions
Java.io-Interface for all input/output operation.
And many more
When we write any java programme the very first line in the code is the package name i.e which package does this programme belong to.This is done essentially to separate two different programmes from each other.It is sort of name space in xml.If two classes have same name they can be differentiated by their package name.A good programming practice is that we should have a package and should have two folders source and code for .java file and for .class file.I will suggest to download the java SE documentation to understand the various package interface classes and methods avaialable.
You can go to www.sun.java.com go to java documentation there and download the java se documentation.
Contents of a java file
A java file should essentially contains the following things
1>the first statement should be the package keyword followed by the package name.
2>zero or more import statement followed by the class name.
3>One or more class or interface defintion followed by the blocks defining them.
Programming in java
Now we will start with the concept of programming.We will write a simple java programme,will see what are the different fields in there and how does it compile and execute.
For this we need to write a class.To define a class we need to have following things
1>Access modifier.-It specifies the availablility of the class from other classes.
2>Class keyword.-It tells java that the following block of code makes a class.
3>Instance filelds.-Constants and variable that are used by the object of class.
4>Consrtuctor.It is a method which has the same name as the name of the class and it is used to control the initial state of the object of a class created.
5>Instance methods.-It is the method within the class to perform the action.
6>Class fields-Constants and variables which are shared by all objects of that class.
7>Class methods-Methods that are used to control the value of class fields.
Understanding main() Method
AS we have seen earlier an interpreter need a main method to start the programme.One class should have one main method to start its execution or we can say it in other words that main the entry point for interepreter to start it.We need define main programme when we are writing an application however when you are writing an applete you need not define a main method as the browser has its own way of starting.
Important points about a main method
1>A main method must exist within a class.
2>It should have the following format
(Access modifier ) (static keyword) (return type) (arguments)
then the block of the code.
So a common format of a main method will be
public static void main(String[] args)
here public is an access modifier,static is a keyword ,void is the rerturn type and String[] args is the argument type.
We have used a term Access modifier what does it mean.It mean the accessibility of the method.
Access modifier are of four type
1.>Public-Public methods can be used by any one.
2>Priavte-Private methods can be seen or used only by the methods within the class.
3>Protected-Protected methods can be accessed by all the classed within the same package and all the derived class(class which are inherited)
4>Default-If you do not specify any access modifier it mean it is of default type.A default method can be accessed only by the derivative and classes within that packageEven a derivative outside the package can not access this method.
Static Keyword-
If a method or variable is define as static it becomes a class method/class variable.
It means that it applies to the class of the object as a whole and not as individual objects hence it is shared by all the objects of the class.
Return Type
A return type is always required in a method.The return type defines the object type that is returned when a method is completed.It can stiring ,integer,object or void value.By default there is not return type in a method.
Arguments
Arguments are the parameters which are required for the method to perform its function.
Example programme
So far what all we have studied we will check them through programme.Hence I will write a simple programme to illustrate various parameters in a java code.Lets check this simple programme.
package practice;
public class Example {
static int phone;
int name;
String value;
public Example() {
}
public static void main(String[] args) {
Example exam = new Example();
System.out.println("This is the entry point for the interpreter");
System.out.println("Value of name =" + exam.name);
System.out.println("Class variable=" + phone);
}
}
Looking from the beginning.I have specified the name of the package.I am not importing any class so I have not used any import statement.
Public class example
Public is the access modifier class is the keyword for defining class and example is the name of my class.One very important point to note here is that the name of the programme should be same as the name of the class and it is case sensitive.So in our case the java code should be saved as Example.java and not example.java.
Next name and value parameter are instance varaibles they can be accessed by methods in a class through object of the class.However variable phone is a class variable and as we have discussed a class variable is present for all the object of the class.
Next is our main method
We are then creating an object for the class example.
Next is we have the system defined command to print the variable values.
If you look in to the code you will find a block called
public Example() {
}
This is the constructor block. And is called when we create a new object for the example class.If you have not defined a constructor the java will provide automatically a default constrructor for the programme.
The instance variables and class variable are assigned a default values as soon as we declare them as here int will have a default value of zero ,string will have a default value of null and so on.
Now look at the two print out statement we are accessing the instance variable name through an object of the class however we are accessing the class variable directly.This is because it is static variable and a static variable can be called directly within a method.
Now we will compile this project.
To compile you have just write
Javac Example.java
I believe you already have set your class path and path variable.This command will cause a .class file to generate in the same location where in where Example.java resides.
Now to run this .class file you need to issue the following command
Java Example
It will give you the following result
E:\jdeveloper\jdk\bin\javaw.exe -client -classpath E:\jdeveloper\jdev\mywork\Application1\Practice\classes practice.Example
This is the entry point for the interpreter
Value of name =0
Class variable=0
Since I am using the IDE Jdeveloper to run my program I am getting jdev jdk as my classpath.
Please check all my class files are generated within the practice package.
You can set the path and class path from command window also by using set command
Aslo during compile time you can provide the class path as follows
Javac –classpath -d
I will try to explain java in my words.
JAva as everyone of us knows is a programming language which is derived from c++.
It is an object oriented programming language.
Object-oriented programming (OOP) is a programming pattern that uses "objects" – data structures consisting of datafields and methods together with their interactions – to design applications and computer programs.
Java is generally referred to as java programming language.The java Virtual machine,java api and java class file work together to make the java phemonenon possible.Java is a robust language and is platform independent.Platform independent mean write once and execute any where.Once you have written the java code you can run it in any where jre is available.
We have discussed that the java architecture consist of four specification.
1>Java programming language.
2>Java class file format.
3>Java application programming interface(java API)
4>Java virtual machine.
Now we will check both the compile-time environment and run-time-environment
Compile time environment
Programme.java -àcompiler àProgramme.class
We have written a simple programme called Programme.java.
The compiler convert it into byte code Programme.class.
This is the only function that took place in compiler.
Now you have the class file so you can execute it in any platform.
It can be on local machine or it can be transferred to another system.
Run-time environment
Run time consist of java api and java virtual machine.The java api and jvm together is also called as java platform.When we write Java programme it access system resources by calling methods in the class which implements java api(example string.class, object.class) .
The class file that we have created “Programme.class” and the class file which implement java api together enters the java virtual machine which acts as an interpreter and execute the byte code to fetch the result.
So finally it comes to JVM.Now we will try to peep inside the JVM what it is and what it does.
Java virtual machine is an abstract computer.Its main job is to load the class files and execute the byte code.JVM contains a classloader and a execution engine.The classloader loads your programme class file and the class file from java api it converts it into byte code and then execution engine execute the byte code.
A simple execution engine acts as an interpreter which executes the byte code one by one,however we have another execution which is much faster than the simple execution engine ,it is just in time compiler or JIT.In this scheme the byte code is converted to native machine code the first time the method is invoked it is then cached so that the next time the code is invoked it can be directly loaded.So it will save time and the execution will be much faster.Now we will check each of the component individually.
Class loader-When a class file run it may need other class files also to perform its execution.These class files are loaded by the class loader in JVM.The class file may be present in the local system or may be in the network.The JVM uses the classpath to point to these class variables.The classpath can be added by using java –cp or java –classpath command.
Example- java –cp c:\jdk_home\jre\lib\tools.jar
One class files are loaded it goes to verification phase where in it check whether the java code fulfills the basic rules of java.This step ensure that no illegal actions are performed.
The jvm act as byte code interpreter that execute the byte code for the loaded class.The JVM keeps track of the memory so once the execution is completed and jvm finds that the object is no longer required.It marked the instace for garbage collection..Thus it manages memory also.Essentially in real application a jvm instance start running by calling the main() method .The main method must be public ,static,return void,and accept once parameter a string array.We will check these details later.This is infact very confusing in java as most of the things are interrealated and we can not have all the concepts at a single time so we will check these in our order.
Java-Object Oriented Programming
An object is a run time representation of a thing.Object oriented programming approach ensures that the programme survives the changes in the changing world and changing business needs.An object is an idividual entity which can be changed without changing the whole application.In shor we can say it is adaptable and reusable.It also defines the term abstraction,encapsulation,inheritance and polymorphism.I will cover it as soon the lesson will proceed.
JDK-Java development kit
The java development kit provides following
1>Compiler that is javac which is used to compile the java code.
If we have a programme movie.java then we will compile it by following command
Javac movie.java
This will create the byte code for the movie code called movie.class.
2>It provides the core class library.The library contains all the class files which are required for the execution of a programme.The jdk provide the library in the form of rt.jar file.
3>Debugger-It provides a debugger which helps in debugging ,finding the real place of error with the exact error messages.In JDK the debugger provided is jdb.
4>Byte code interpreter or jvm-IT interpret the byte code.
5>Documentation generator-Provide opportunity to create the java doc representing the structure of class files in the programme.
6>Java archieve utility-Several class files can be bunched together to form a jar file out of it.
Different edition of java
Java,Micro Edition-Used for small applications like smart cards,pagers,mobile etc.
Java Platfrom Standard Edition-Development environment for internet applications
Java Platform,Enterprise Edition-For implementation in application server.
Integrated development Environment
IDE is a tool which is used now a days to write your programme.It has many components which helps us in writing our code easily.It has some prebuilt code and other faciliteis which helps in decreasing the real time of creating an application code.
Most commonly used IDE is eclipse and jdeveloper.However we will be using jdeveloper for illustration.Again covering jdeveloper is a vast topic so I will directly go inside programming concept.You can write the same code in notepad and save and compile it using your command prompt.
Programming
To Start with programming in java we first of all need to know what is an object and what is a class.
We will try to understand the concept with the following example.Let suppose we want to construct a house.We might be having lot of ideas in our mind but we can not go with the same idea to construct a real house as physically the implemetation will be very different.So we need to model an architecture for the building i.e we need to first create map which covers all the essential details like how much materila will be used,what will be the cost and all other important details.
In java the class does the same work.It is the blueprint which defines the object.So essentially a class contain several properties and methods.
Now once the blue print or map is ready one can go ahead with this and implement the map in to physical existence.
In java objects do the same work.They use the class to retain there structure and behaviour to perform the task.
Understanding variable and methods
Lets suppose we have a pen then what can be attribute and functionality of the pen.The attribute may be lead colour,brand name,ink quantity and the methods can be to write.
In a similar way a class have variable and methods which together defines the attributes and functionality of the class.
As we have seen an object is basically derived from class.The object must be referenced to work with it.In java we create an object using the new command.
So if we have a Movie class we can create a object of movie class by following method
Movie obj=new Movie();
Here obj is our object and the new operator is used to create an object for a class.The object “obj” contains the reference for the newly created object of the movie class.
Let suppose our movie class has some methods.
How one will execute this method.They have to be called from the object
So if we have a method called rating() in our movie class it can be invoked by the object in the following way.
Call method from object- obj.rating()
As we have discussed the object has a reference.Its values are stored in the memory as a hashcode value.We will check it once we will get in to the details of programming.
As we have seen in our real world example we need to have a map in order to construct a house then only physical implementation tooks place.So this map can be used to create many other physical implementation.It can be implemented in the similar way by some other or can be changed in some way by others.Similarly in java a class can have multiple instance(objects).So we got the following idea about the class and object.A class is a template for the objects.A class defines variables and methods for all the instances of the class.
Now we will check some important terminology and concepts of oops(object oriented programming langauge).Java is called as an object oriented programming langague.The reason I am covering these definiton later is that I wanted to present an idea of object before getting in to what an object oriented programming languge mean.
Encapsulation
Encapsulation allows you to ignnore the low level details of how the object is structured and how it works internally.Lets take example of a television.We are not bothered about how it works internally.We only need to know how to start it and close it that is through interfaces provided like remote but we are not at all bothered how the lcd of tv works how it gets signal from antenna.These low level details are not required by us.Lets suppose the television company changes the software internally but still the interfaces are same that is still remote is same.So encapsulation hides the internal structure and operation of an object behind an interface.In our example television is an object and remote is the interface.
Inheritance
We often come across words saying that guy has inherited most of his father’s style or something like that.What exactly it mean.It mean that both the father and the son have commonality in them.Similary in java one class can inherit the other class.The class which is inherited is called as superclass and the one who inherit it is called as subclass.
A subclass is a kind of superclass.Now lets dig more in to it in terms of java ,Lets suppose we have a class called “two wheeler” as clear from the name,This class contain variables like wheel,gear,brakes and methods run stop.Now any other classes like herohonda,yamaha should be a subclass for the “two wheeler” class as “two wheeler” class is the superclass which defines all the basic format for a two wheel vehicle so it does not depend whether it is a herohonda motorcycle or a yamaha ,they have to have the brakes,gears and methods to run ,stop.But herohonda or yamaha can have there extra variable and methods in addition to the methods and variables defined in super class,i.e.
Herohonda can implement its own quickstart method,yamaha can have its own lighting on-off mechanism.So a subclass object should have all the variables and methods of a superclass object and in addition it can have its own methods and variables.
Polymorphism
Polymorphism means many forms.It means one operation can be perfomed by different methods or different ways.Suppose we have three person A,B and C all of them go to office by their own convenient way.A prefers to walk ,B uses motorcycle and C uses a Car.One important requirement of polymorphism is that same operation should be called for all the objects.So in our case if we issue an operation go to office then for the three person A,B and C the operation will be same but the way of going to office is different.
So Essentially a polymorphism requires that an object should send same message to different objects,enabling different objects to repsond in their own way.Polymorphism requires that the different objects implementing the same operation must have same semantics.In java we use the concept of polymorphism in overloading and overriding.
For the time being overloading a method mean using the same semantics but with different parameters to call a method and over riding means the sub class defining the same method in its own term as in the superclass.Java does not support operator overloading .Opearator overloading is supported only for + operator.
We will be covering all these definition later also when we will start programming.
Java Package
In java certain classes are grouped together in to a package as per their functionality.For example
Java.lang –contains all language functions
Java.io-Interface for all input/output operation.
And many more
When we write any java programme the very first line in the code is the package name i.e which package does this programme belong to.This is done essentially to separate two different programmes from each other.It is sort of name space in xml.If two classes have same name they can be differentiated by their package name.A good programming practice is that we should have a package and should have two folders source and code for .java file and for .class file.I will suggest to download the java SE documentation to understand the various package interface classes and methods avaialable.
You can go to www.sun.java.com go to java documentation there and download the java se documentation.
Contents of a java file
A java file should essentially contains the following things
1>the first statement should be the package keyword followed by the package name.
2>zero or more import statement followed by the class name.
3>One or more class or interface defintion followed by the blocks defining them.
Programming in java
Now we will start with the concept of programming.We will write a simple java programme,will see what are the different fields in there and how does it compile and execute.
For this we need to write a class.To define a class we need to have following things
1>Access modifier.-It specifies the availablility of the class from other classes.
2>Class keyword.-It tells java that the following block of code makes a class.
3>Instance filelds.-Constants and variable that are used by the object of class.
4>Consrtuctor.It is a method which has the same name as the name of the class and it is used to control the initial state of the object of a class created.
5>Instance methods.-It is the method within the class to perform the action.
6>Class fields-Constants and variables which are shared by all objects of that class.
7>Class methods-Methods that are used to control the value of class fields.
Understanding main() Method
AS we have seen earlier an interpreter need a main method to start the programme.One class should have one main method to start its execution or we can say it in other words that main the entry point for interepreter to start it.We need define main programme when we are writing an application however when you are writing an applete you need not define a main method as the browser has its own way of starting.
Important points about a main method
1>A main method must exist within a class.
2>It should have the following format
(Access modifier ) (static keyword) (return type) (arguments)
then the block of the code.
So a common format of a main method will be
public static void main(String[] args)
here public is an access modifier,static is a keyword ,void is the rerturn type and String[] args is the argument type.
We have used a term Access modifier what does it mean.It mean the accessibility of the method.
Access modifier are of four type
1.>Public-Public methods can be used by any one.
2>Priavte-Private methods can be seen or used only by the methods within the class.
3>Protected-Protected methods can be accessed by all the classed within the same package and all the derived class(class which are inherited)
4>Default-If you do not specify any access modifier it mean it is of default type.A default method can be accessed only by the derivative and classes within that packageEven a derivative outside the package can not access this method.
Static Keyword-
If a method or variable is define as static it becomes a class method/class variable.
It means that it applies to the class of the object as a whole and not as individual objects hence it is shared by all the objects of the class.
Return Type
A return type is always required in a method.The return type defines the object type that is returned when a method is completed.It can stiring ,integer,object or void value.By default there is not return type in a method.
Arguments
Arguments are the parameters which are required for the method to perform its function.
Example programme
So far what all we have studied we will check them through programme.Hence I will write a simple programme to illustrate various parameters in a java code.Lets check this simple programme.
package practice;
public class Example {
static int phone;
int name;
String value;
public Example() {
}
public static void main(String[] args) {
Example exam = new Example();
System.out.println("This is the entry point for the interpreter");
System.out.println("Value of name =" + exam.name);
System.out.println("Class variable=" + phone);
}
}
Looking from the beginning.I have specified the name of the package.I am not importing any class so I have not used any import statement.
Public class example
Public is the access modifier class is the keyword for defining class and example is the name of my class.One very important point to note here is that the name of the programme should be same as the name of the class and it is case sensitive.So in our case the java code should be saved as Example.java and not example.java.
Next name and value parameter are instance varaibles they can be accessed by methods in a class through object of the class.However variable phone is a class variable and as we have discussed a class variable is present for all the object of the class.
Next is our main method
We are then creating an object for the class example.
Next is we have the system defined command to print the variable values.
If you look in to the code you will find a block called
public Example() {
}
This is the constructor block. And is called when we create a new object for the example class.If you have not defined a constructor the java will provide automatically a default constrructor for the programme.
The instance variables and class variable are assigned a default values as soon as we declare them as here int will have a default value of zero ,string will have a default value of null and so on.
Now look at the two print out statement we are accessing the instance variable name through an object of the class however we are accessing the class variable directly.This is because it is static variable and a static variable can be called directly within a method.
Now we will compile this project.
To compile you have just write
Javac Example.java
I believe you already have set your class path and path variable.This command will cause a .class file to generate in the same location where in where Example.java resides.
Now to run this .class file you need to issue the following command
Java Example
It will give you the following result
E:\jdeveloper\jdk\bin\javaw.exe -client -classpath E:\jdeveloper\jdev\mywork\Application1\Practice\classes practice.Example
This is the entry point for the interpreter
Value of name =0
Class variable=0
Since I am using the IDE Jdeveloper to run my program I am getting jdev jdk as my classpath.
Please check all my class files are generated within the practice package.
You can set the path and class path from command window also by using set command
Aslo during compile time you can provide the class path as follows
Javac –classpath