In SOA Suite 10g we were having ESB-Enterprise service bus whose main function was routing and transformation,From 11g ESB has been removed.Now we have Mediator component in place of ESB for doing the job of ESB and we have most advanced service bus Oracle Service Bus.For now don't ask me abt OSB we will check it later.
We will just use the previous exercise test case to just understand the look and field and functionality of Mediator component.
Drag and drop a mediator component in to your Jdeveloper 11.1.1.3 and choose define service later.I always prefer to define the service later even if i am using a BPEL service this is not recommended but its a gud approach.
Now choose the arrow sign in exposed service and connect it to Mediator similarly choose the outgoing arrow sign and map it to external service so your process should look like this.
Now double click on the mediator and you will see a familiar screen as of esb.
This is probably not a gud example but is only for understanding because mapping here wont be a fun to see.Again there is one important field in this page called as Resequence.This field can be set to route the data in a sequential order.
I will use a simple assign activity in this mediator to show the use case for this mediator,Just click on the assign activity in last of assign values section a window will come up like this
Click on + activity and choose expression on both the side as below
Choose on expression builder tool and select the input value that you want to get assigned.
Similarly choose output variable also to whom you want to assign the data.
Say ok and you can now see the variable in the assign
NOw in this process we are trying to get the values from the database hence it should have a synchronous reply block also defined.
For that click on the target service operation and you will get a window like this
Click on service and choose the and choose the service from which you want a call back.IN our case we want a reply from database wsdl so we chooses that.
Again we can create a variable of input type to store the values returned by the database.You can either use transformation or assign activity to get this done.I am not covering this and leaving it to you to explore its features.
Again i have found some issue with my reply from database,I used assign activity to assign the variable received from database to another variable and i got my database adapter response for the variable as
I am not sure why this attribute gets added the i went in to the source of the xsd and found it was set as
xs:element name="fName" minOccurs="0" nillable="true"
nillable="true" was the value causing the value to be displayed when i removed it ,it saw the normal structure of the elements.
Element that is nillable means that the element ca be empty without causing a validation error. For each of the XML schema built-in types that map to a Java primitive, there is a corresponding Java primitive wrapper that can be used if a nillable="true" attribute is specified.
The views expressed on this blog are my own and do not necessarily reflect the views of any Organisations owning these products.I keep on doing R & D with different products in and around Middle ware stack and these posts are result of that.Most of the post are result of my own experiments or ideas taken from other blogs .If in any case You feel content is not right you can comment to remove that post. This blog uses the default features,cookies of blogspot.com
Thursday, May 20, 2010
Wednesday, May 19, 2010
Adding External reference(DB adapter) in SOA Suite 11.1.1.3-part4
Open you jdeveloper and drag and drop a db adapter in the external reference swimlane.
It will open window
give it some logical name
Create a new connection
Provide the details of schema and check it
I got this exception but i am not sure what does it mean so ignoring it.
Choose to select the table.
Now choose the table
You might find an issue while searching your table as i faced when i clicked on search i found no table in my schema.This is because i have not committed the changes that i have made in the schema.So in my case i have again create the table and then commit those changes.
Further i am choosing CVV number as my primary key.
sinc we have only one table so we need not define any realtionship here
Again i would like to get all the parameters from db
Again next window is for Define selection criteria i am not sure of its use but we will check later.Say next and confirm.
Say next and finish and you should see the db adapter in Exteranl service
This is it for this exercise we will try to add process in component section in next exercise.
Auto transformation is not working properly in jdeveloper 11.1.1.3
I was working with an XSL file in jdeveloper and i found the following behavior.
All the input fields are not mapped to all the output field in jdeveloper 11.1.1.3 when you use auto map feature.
That is when you select the parent node of source and map it to the parent node of target all the fields are not mapped ,some fields remains unmapped and has to be mapped manually.
All the input fields are not mapped to all the output field in jdeveloper 11.1.1.3 when you use auto map feature.
That is when you select the parent node of source and map it to the parent node of target all the fields are not mapped ,some fields remains unmapped and has to be mapped manually.
Tuesday, May 18, 2010
Creating the XSD for receiving the input WSDL in SOA Suite 11.1.1.3-part3
In this exercise we will see how we will create an xsd file and then how we will use that xsd file to create a wsdl file out of that.
First of all we will create our xsd file to accept the five input variables for credit card.
<xsd:schema xmlns:xsd="http://www.w3.org/2001/XMLSchema" xmlns="http://arpit.rahi/com"
targetNamespace="http://arpit.rahi/com" elementFormDefault="qualified">
<xsd:element name="creditcardInfo">
<xsd:complexType>
<xsd:sequence>
<xsd:element name="cvvNumber" type="xsd:string"/>
<xsd:element name="f_name" type="xsd:string"/>
<xsd:element name="l_name" type="xsd:string"/>
<xsd:element name="card_no" type="xsd:string"/>
<xsd:element name="expirymonth" type="xsd:string"/>
</xsd:sequence>
</xsd:complexType>
</xsd:element>
</xsd:schema>
This is the schema i have created for my use case.It i very simple and as you can see i have a complex element called as creditcardInfo which is of complex type and which contain a sequence of elements which are nothing but the input for a credit card.
Now we will see how to use this xsd to generate a web service in SOA Suite 11g.
Open your jdeveloper 11.1.1.3
Create a new application
Give project name and select SOA technology
Create an empty composite and say Finish
Now if you will your jdeveloper for the new composite created you will find three swinlane
first is Exposed services
second is components and third is external reference.
Exposed services are the starting point for any application.It is exposed to the client ,components section is the one where in we design our application and orchestrate it.External reference section is for communicating with external agents like CRM,DB,file etc.
So in our scenario we need first of all an exposed service which uses our xsd file to generate a web service for the client.
go to you jdeveloper.IN the component choose SOA and drag and drop Web Service in the Exposed service swinlane.As soon as you will drop it a gui will open like this.
Now give some logical name to web service and click on Generate WSDL from schemas.
Once you will click on that following page will open
Click on search icon to find the WSDL file and then this window will come up
Click on import Schema files
Choose the XSD file that we have created
Now in the type choose choose the XSD
Now keep on saying ok
So now you can see in your jdeveloper a web service is created in exposed service.This will accept the credit card information for our project.
That is it for this exercise we will add a BPEL process in next exercise and further design our process.
Sunday, May 16, 2010
Not able to see complete Flow in SOA 11.1.1.3
You have created a simple hello world process in your newly installed SOA suite 11.1.1.3 you deployed it and you got the result also but when you tried to look in to the flow you were not able to see the flow.
This happens because by default the audit level is set for production .
Different values for audit level are
"Production" (default): Composite instance tracking is collected, but Mediator engine will not collect payload details and BPEL engine will not collect payload details for assign activities (payload details for other BPEL activities are collected). This level is optimal for most normal production operations.
"Development": Allows both the composite instance tracking and payload detail tracking. However it may impact the performance. This level is useful mostly for testing and debugging purposes.
"Off": No logging is performed. Composite instance tracking and payload details are not collected.
So now it is clear why you were not able to see the flow clearly so in order to just see the flow you need to change the audit level.
To change
1>Log in to em console
http://host:port/em
2>Navigate to soa--->Soa Infrastructure
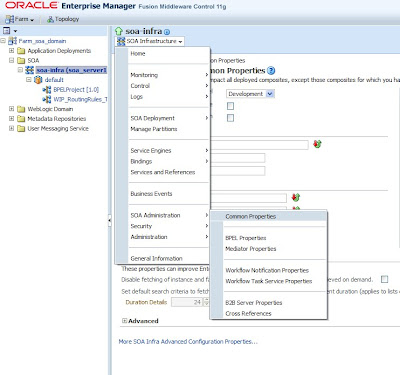
Now in the right hand side drop down SOA Infrasructure and choose SOA Administration-->Common Properties
This will be set to production by default change it to development and recheck the flow you should now be able to see the flow.
And to add it is recommended to use the same version of jdeveloper as that of SOA suite so use 11.1.1.3 jdev only and remove the proxy connection from jdeveloper otherwise you will get deployment error while trying to deploy any process from jdeveloper.
Saturday, May 15, 2010
Creating database resources in SOA Suite 11.1.1.3 -part2
Log in to console
http://localhost:7001/console
Go to domain structure -->Services-->JDBC-->Data Sources
Click new
give data source name and its jndi properties
Provide details for your database
As i have created a user arpit i will be using the same here
Test your configuration
Say next and select the targer server for your application
Now create a connection pool
Go to deployment and click on dbAdapter
No got to Configuraiton-->Outbound connection pool and create a new conenction pool
And den say finish
Now again you will get an option to save the deployment plan.
Last time while creating the jms resource i have used th default location this time use some different location otherwise same deployment plan will be overwritten.
You first need to create the folder and then navigate till that folder from console to save the deployment plan.
Now again choose the new connection pool that you have created
give the jdbc name that you have created earlier as an Xa datasource name and save it.
Now again go to deployment select db adpater and select update ,the same way we have done in our last exercise for JMS moudles.